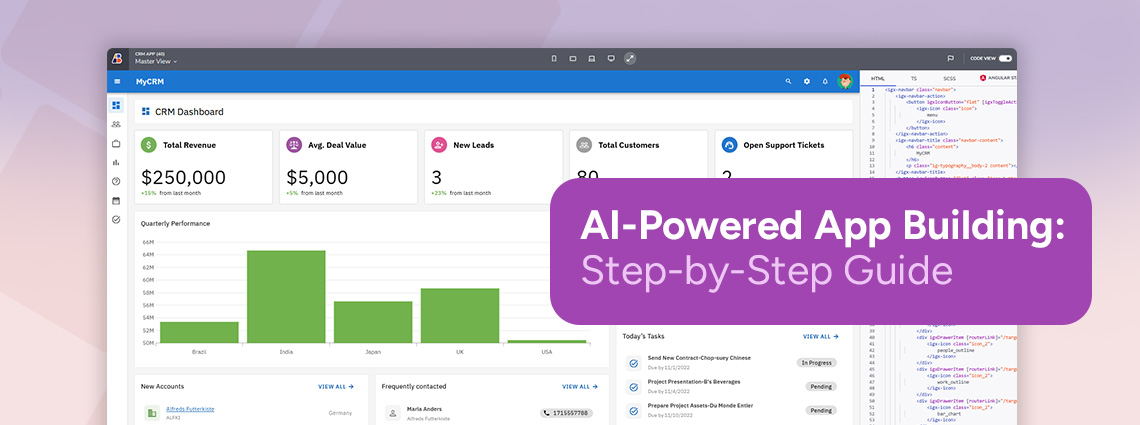

App Builder에서 역할 기반 API를 사용하여 앱을 만드는 방법
이 튜토리얼에서는 역할 기반 API와 로우 코드 App Builder 플랫폼이라는 두 가지 강력한 도구를 사용하여 완전히 기능적이고 사용자 정의 가능한 앱을 만들 것입니다.
 Svetloslav Novoselski 13min read
 이 흥미로운 튜토리얼에서는 이전 튜토리얼에서 만든 API와 App BuilderTM 플랫폼이라는 두 가지 강력한 도구를 결합하여 기술을 한 단계 높일 것입니다. 이렇게 함으로써 다양한 플랫폼에서 사용할 수 있는 완전히 기능적이고 사용자 정의 가능한 애플리케이션을 만들 것입니다.
App Builder는 사용자가 최소한의 코딩 경험으로 강력한 애플리케이션을 만들 수 있도록 하는 강력한 도구입니다. 사용자 친화적인 인터페이스로 다양한 요소를 쉽게 드래그 앤 드롭하여 세련되고 전문적으로 보이는 애플리케이션을 빠르게 만들 수 있으며, Angular, Blazor 또는 Web Components로 코드를 생성할 수 있습니다.
App Builder 시도하기 App Builder 시도하기 App Builder 시도하기
로우 코드 App Builder에서 첫 번째 애플리케이션 만들기
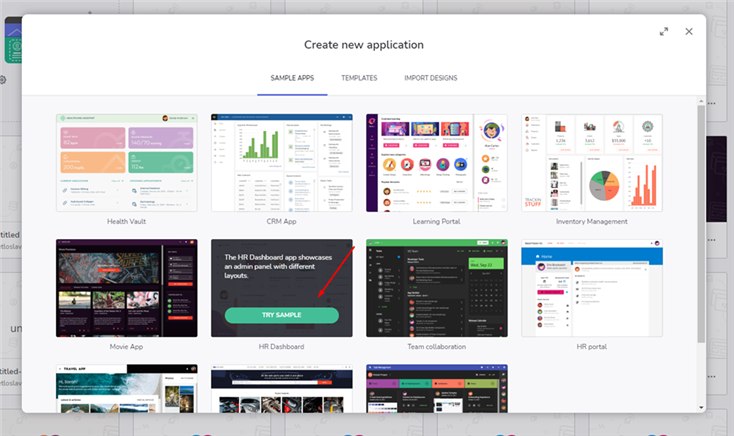
시작하려면 App Builder를 실행하고 “새 애플리케이션 만들기”를 선택합니다. 다음으로 “샘플 앱” 섹션으로 이동하여 프로젝트의 기본 설계로 HR 대시보드를 선택합니다. 거기서부터 특정 요구 사항에 맞게 설계를 확장하고 사용자 정의할 수 있습니다.
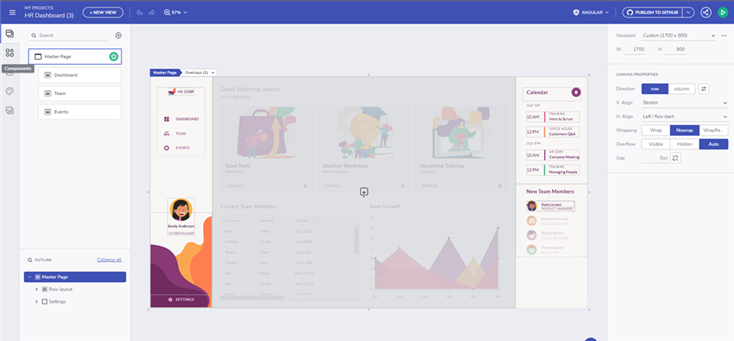
샘플을 열면 이미 여러 페이지가 만들어져 있을 것입니다. 하지만 프로젝트의 요구 사항에 더 잘 맞추려면 이러한 페이지 중 일부를 수정하고 새로운 페이지를 만들어야 합니다.
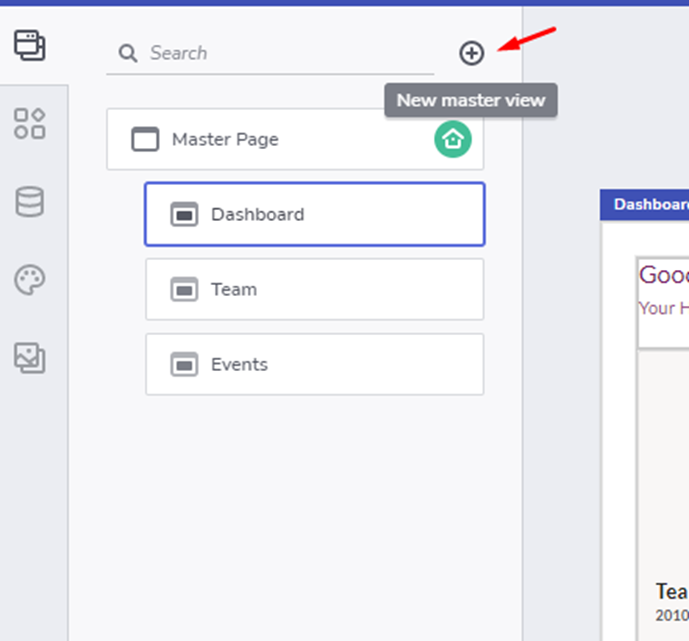
이제 로그인 및 등록 페이지를 만들어 봅시다. “보기” 탭으로 이동하여 더하기 아이콘을 선택하여 “등록 페이지”라고 이름 지을 새 페이지를 만듭니다.
일관성을 유지하기 위해 마스터 페이지의 배경을 등록 페이지에도 재사용할 수 있습니다. 열 레이아웃을 추가해야 합니다. 이 레이아웃 내에는 등록 콘텐츠가 있는 제목과 다섯 개의 입력 필드 및 버튼이 포함됩니다. 모든 입력 필드는 필수이어야 하며 적절한 유형이 지정되어야 합니다.
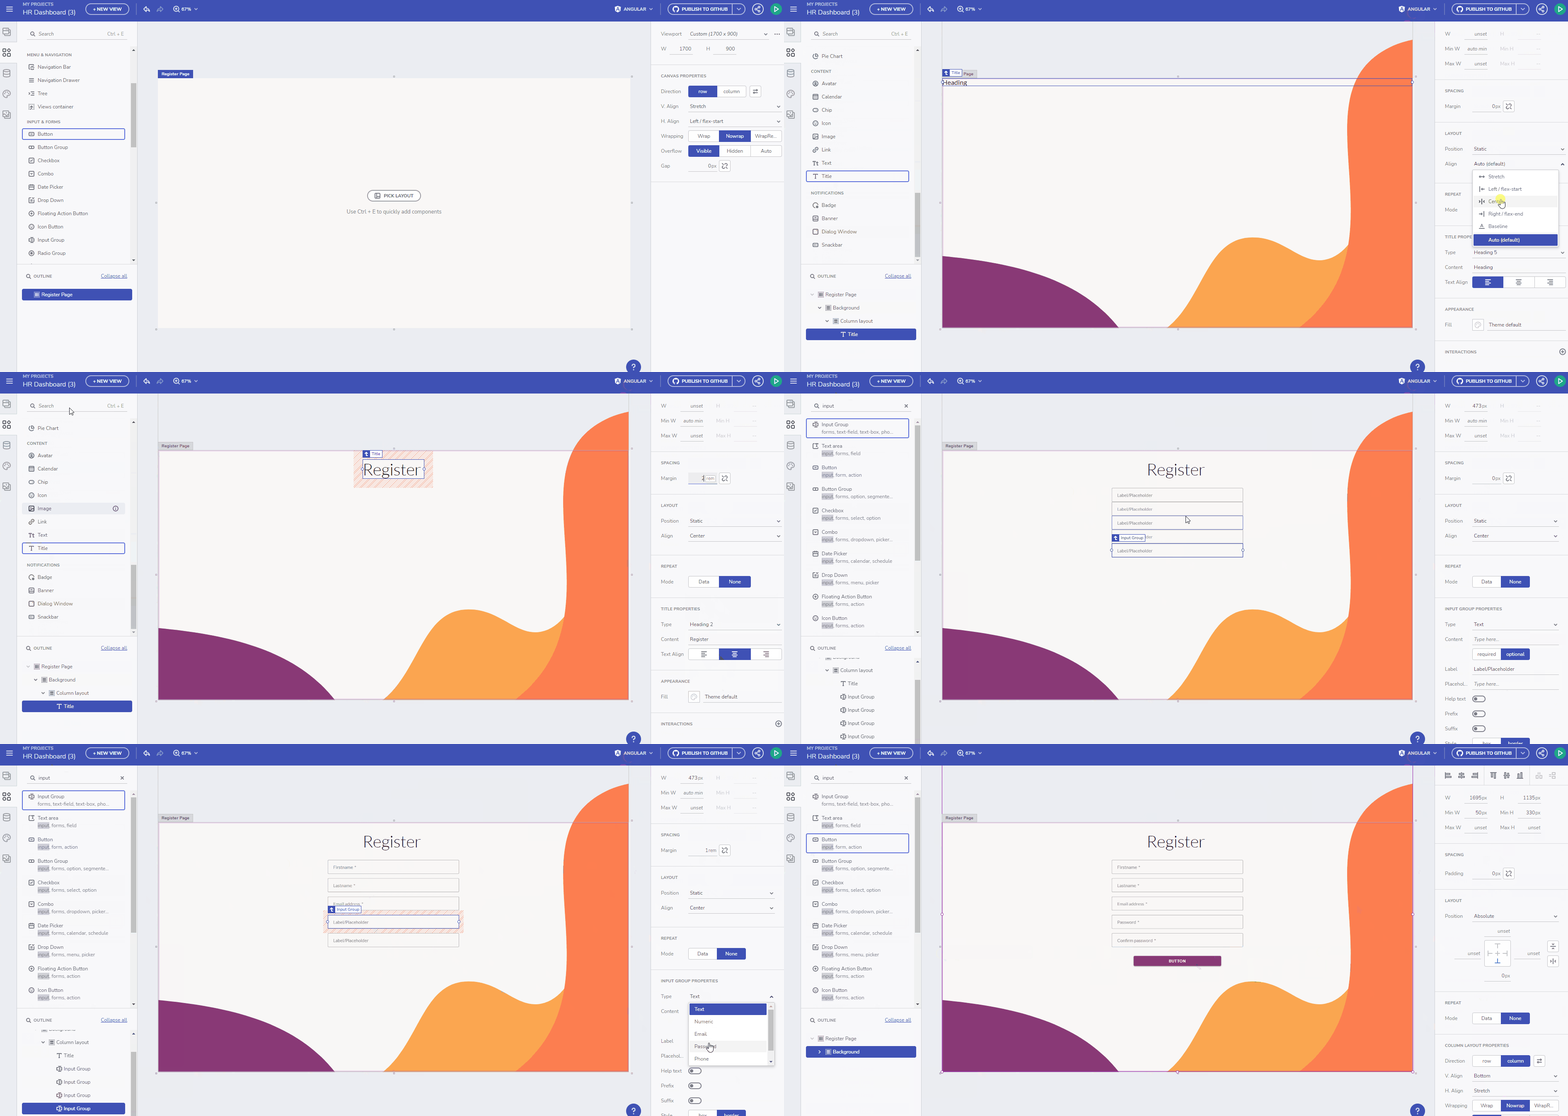
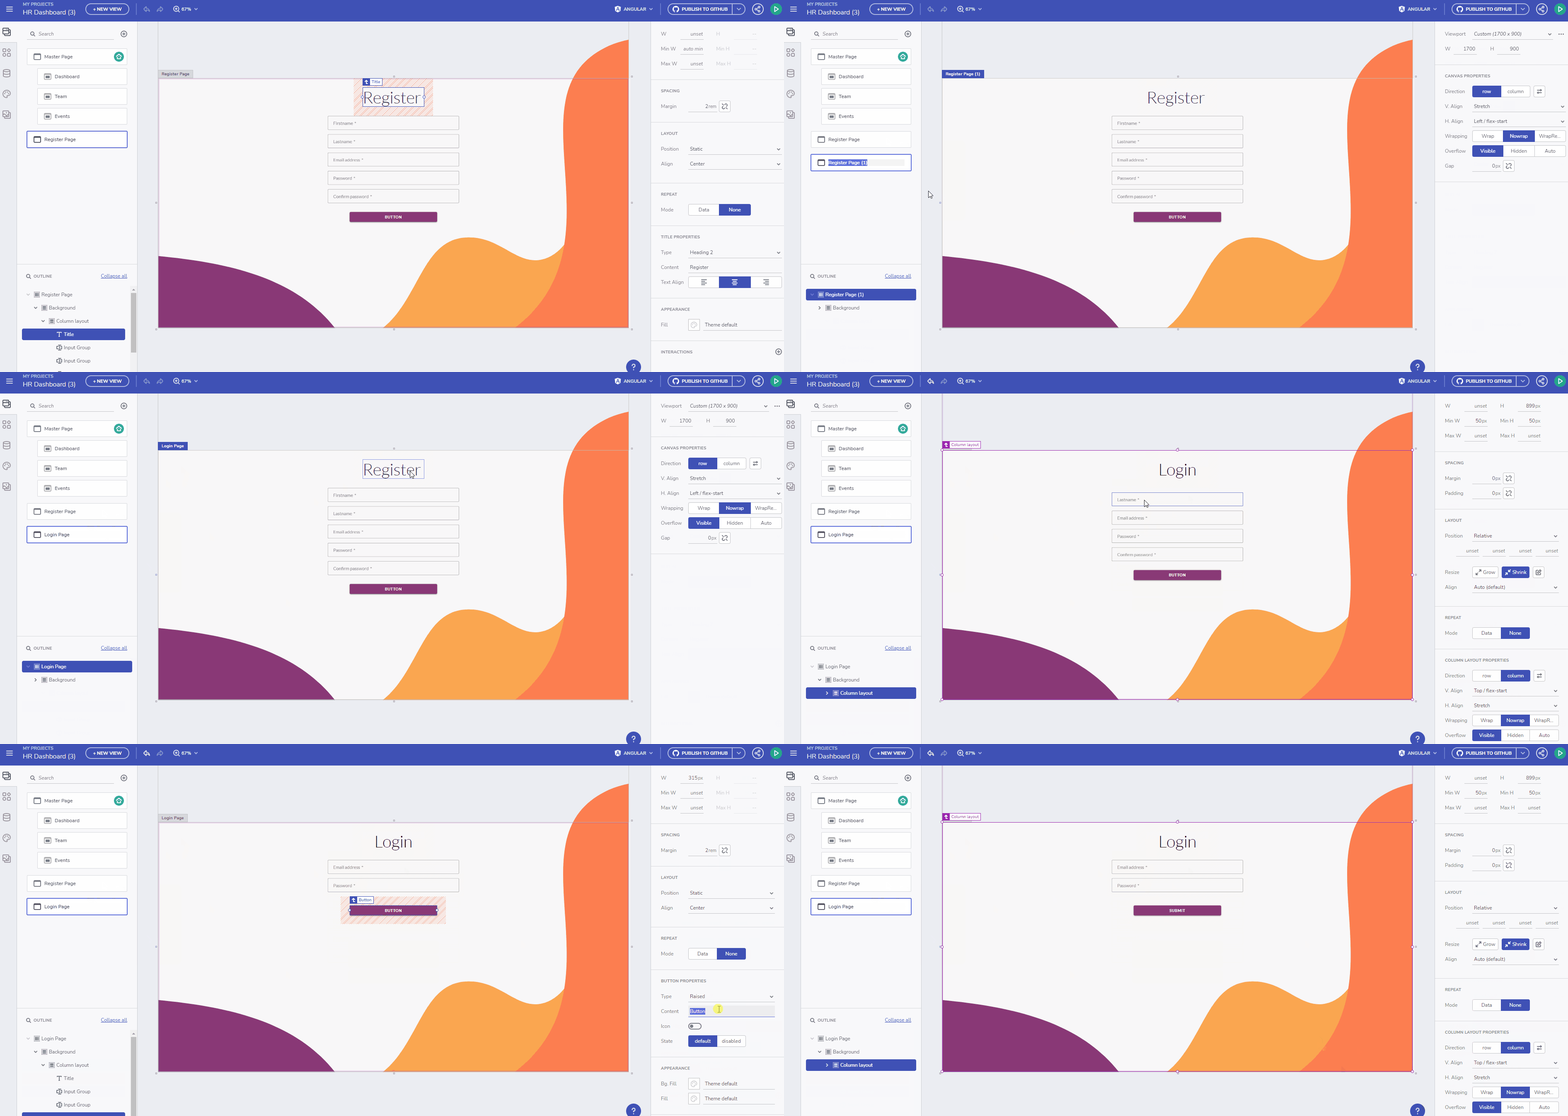
다음으로 로그인 화면을 만들 수 있습니다. 이 화면은 두 개의 입력 필드만 필요합니다. 하나는 이메일용이고 하나는 비밀번호용입니다. 프로세스를 단순화하기 위해 등록 페이지를 복제하고 불필요한 요소를 제거할 수 있습니다.
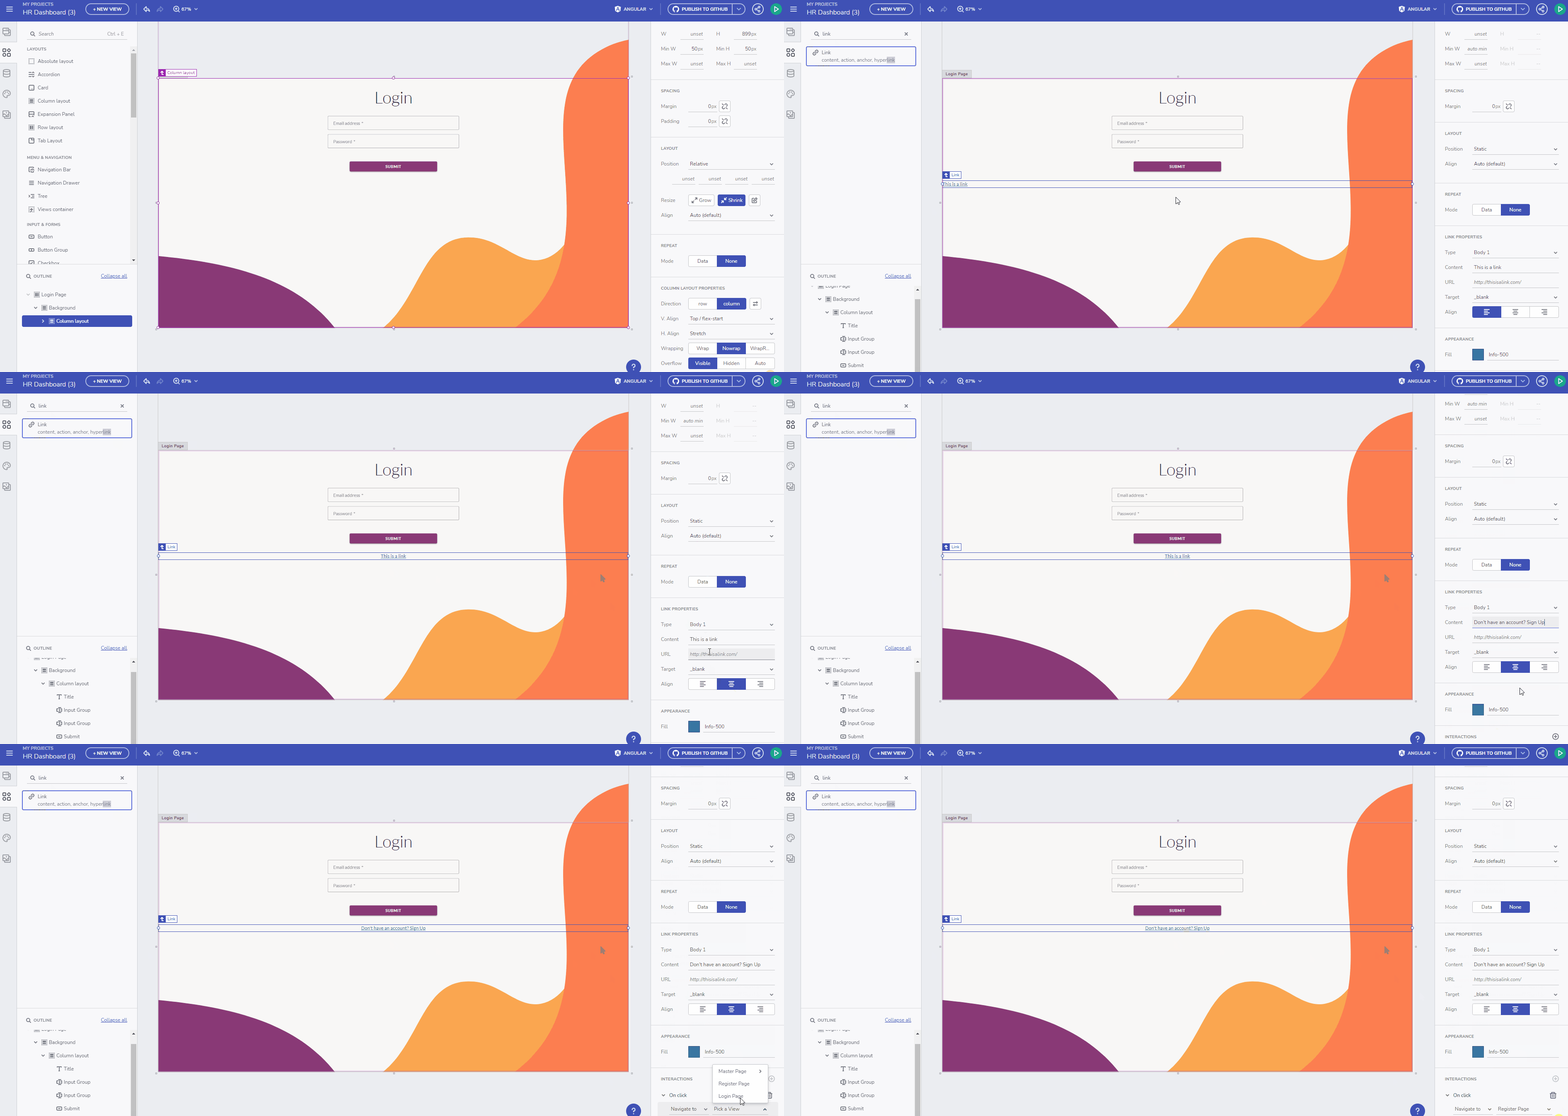
두 페이지가 모두 만들어지면 제출 버튼 아래의 각 페이지에 링크를 추가할 수 있습니다.
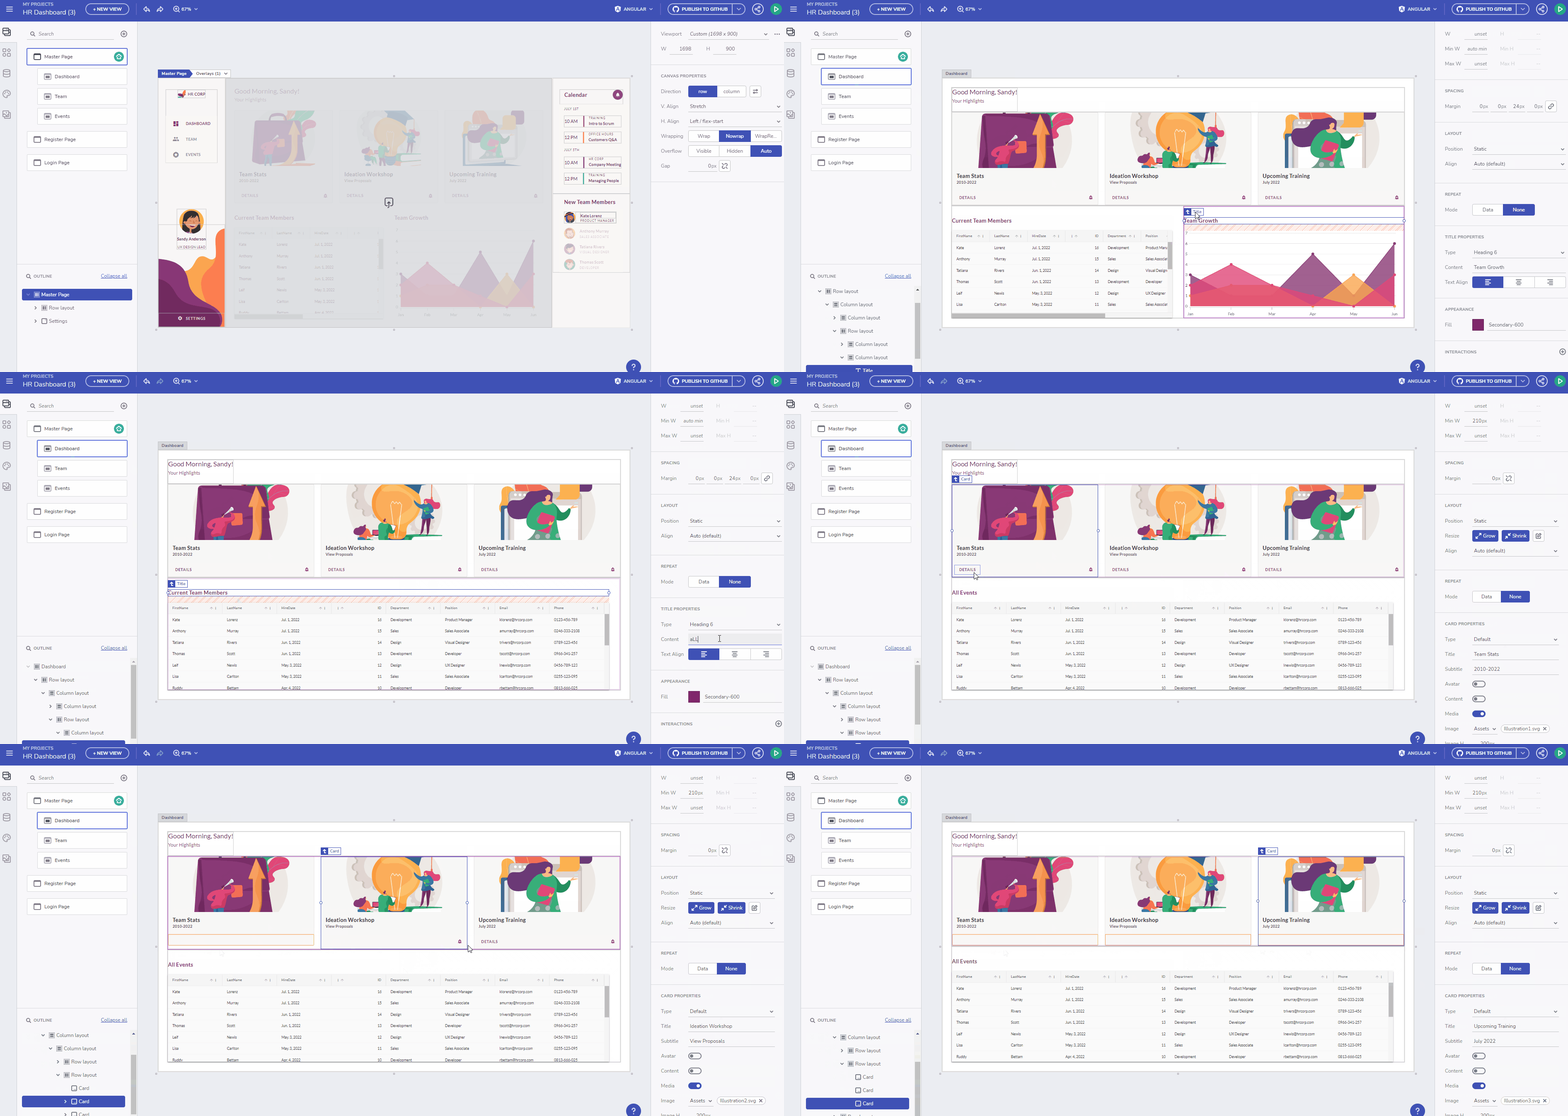
홈 페이지에는 현재 사용자가 참석하고 있는 모든 이벤트를 카드 구성 요소로 표시하는 대시보드가 포함됩니다. 사용자가 관리자 역할을 가지고 있는 경우 플랫폼의 모든 이벤트가 있는 그리드도 표시되며, 필요에 따라 CRUD 작업을 수행할 수 있습니다.
앞으로 나아가면서 새 이벤트를 추가하기 위한 페이지를 만들 것입니다. 이 페이지는 관리자 역할을 가진 사용자만 액세스할 수 있지만 나중에 튜토리얼에서 다룰 것입니다. 각 이벤트에 대해 제목, 카테고리, 참석 사용자의 이메일 및 이벤트 날짜가 필요합니다.
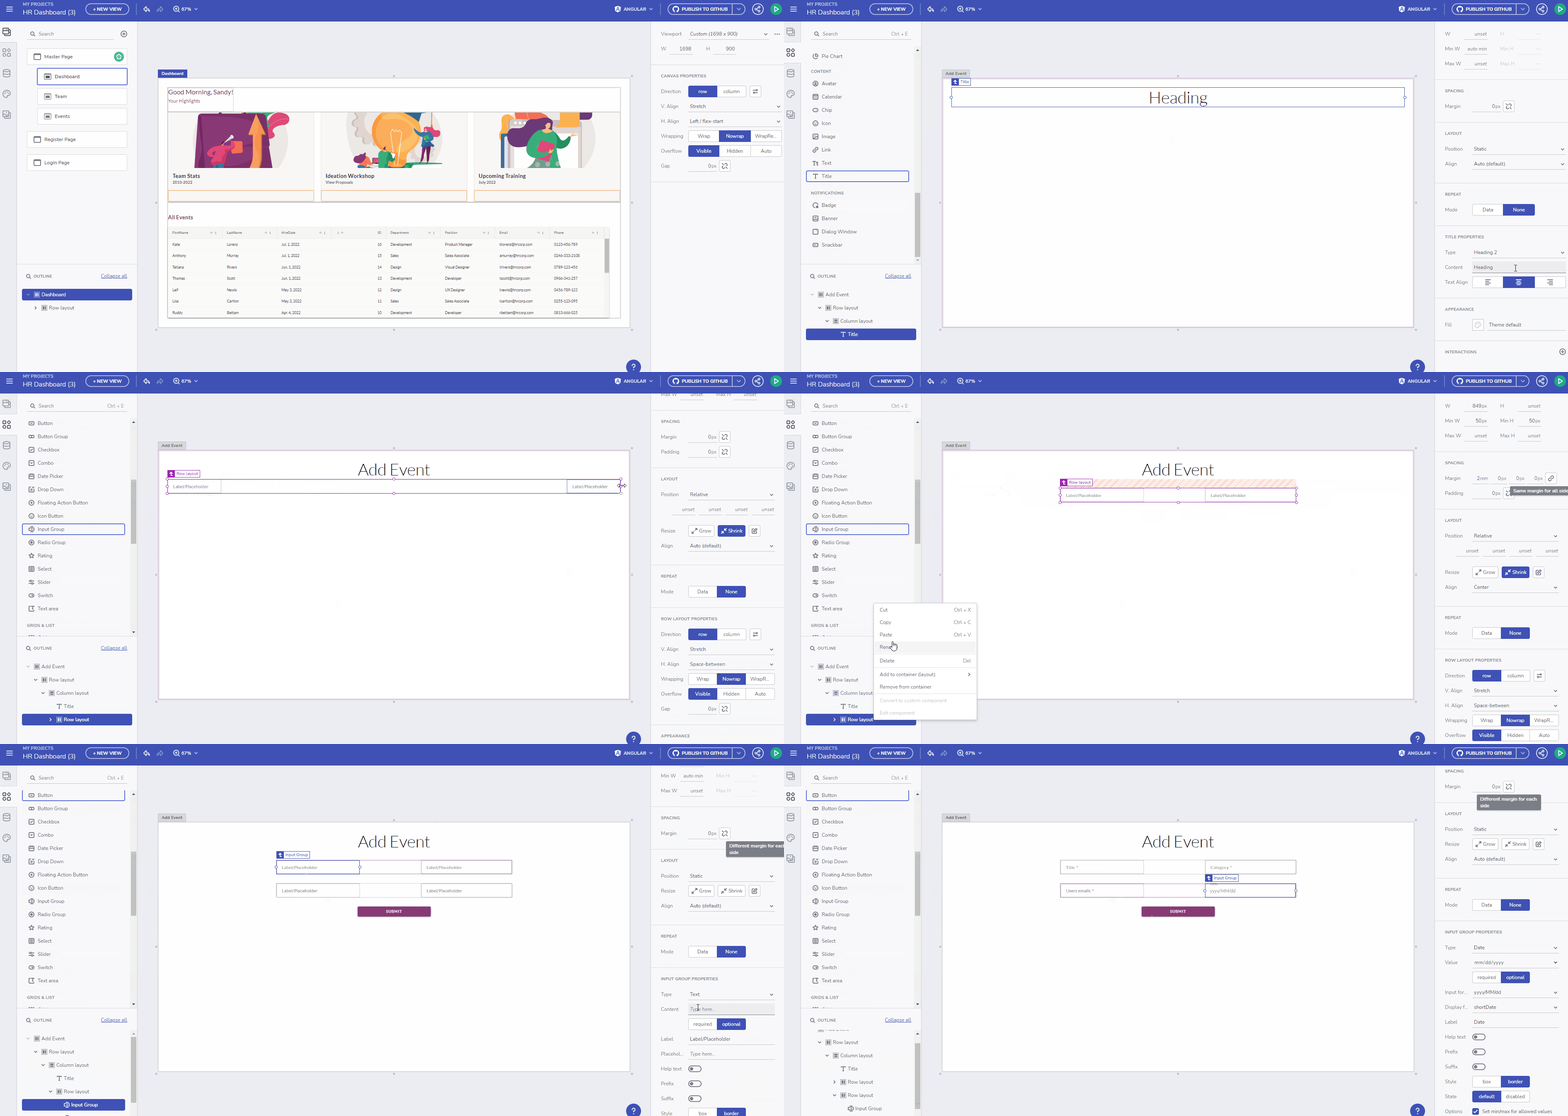
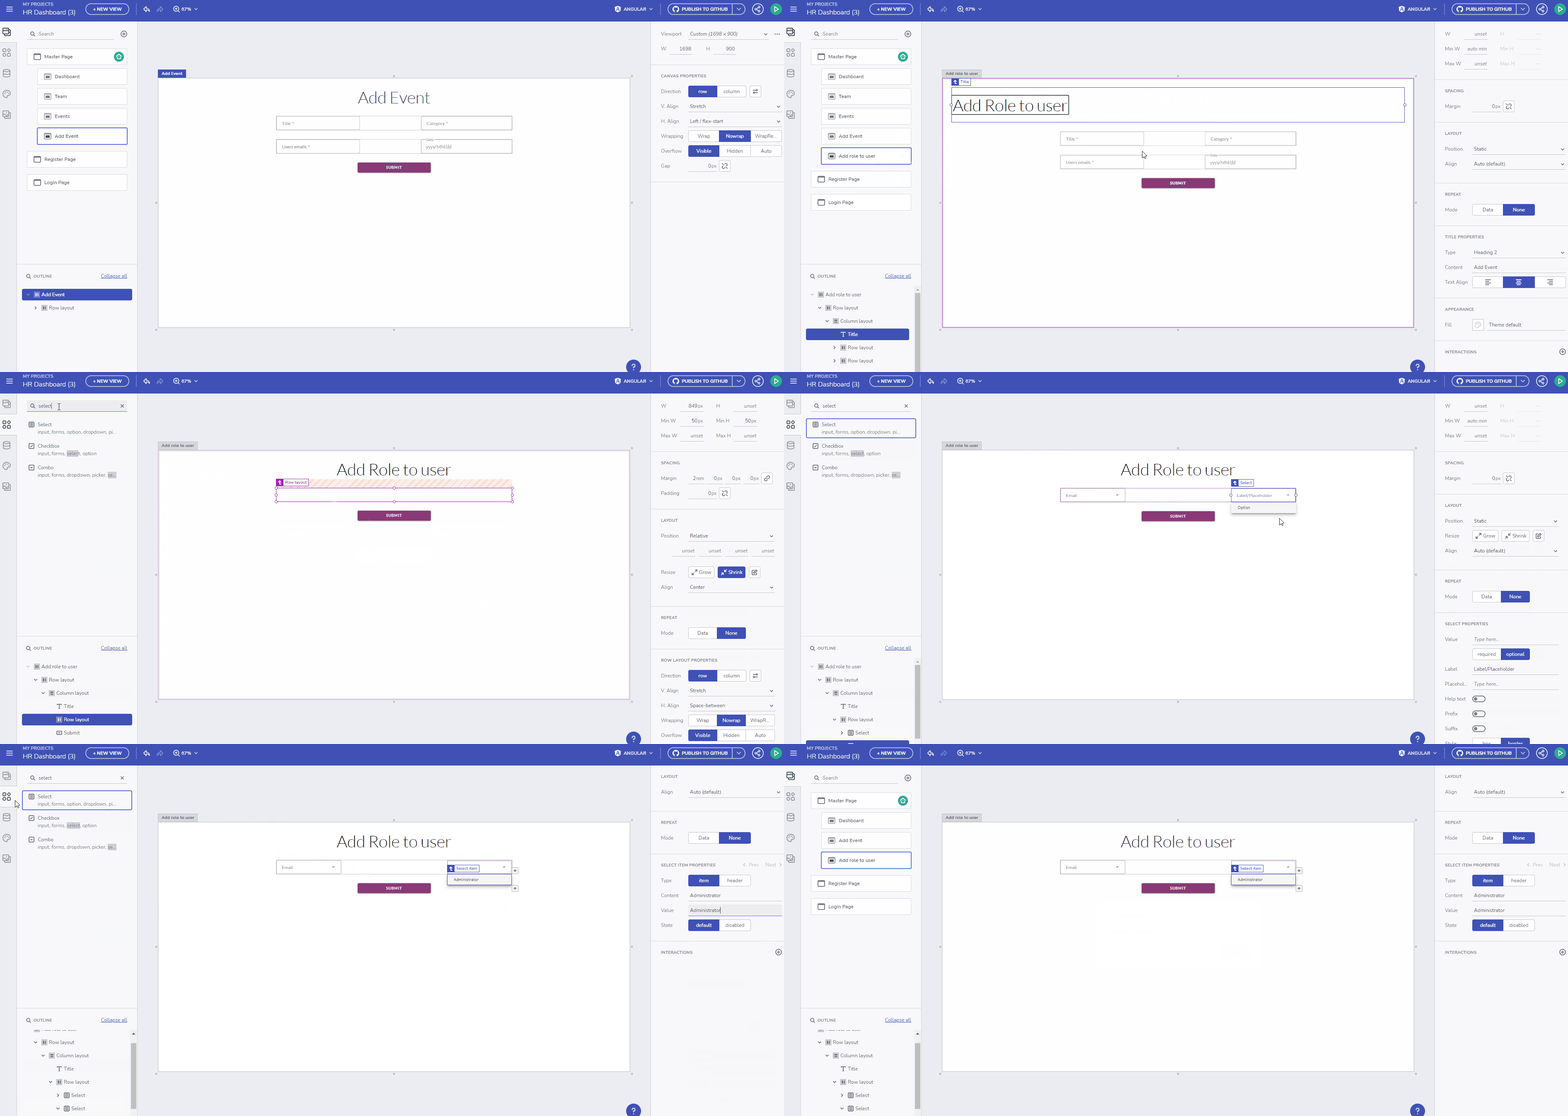
또한 사용자 역할을 변경하기 위한 유사한 페이지를 만들어야 합니다. 이벤트 페이지와 유사하게 이 기능은 관리자만 액세스할 수 있습니다. 이 데모를 위해 다른 사용자에게 관리자 권한을 부여하는 것만 지원할 것입니다.
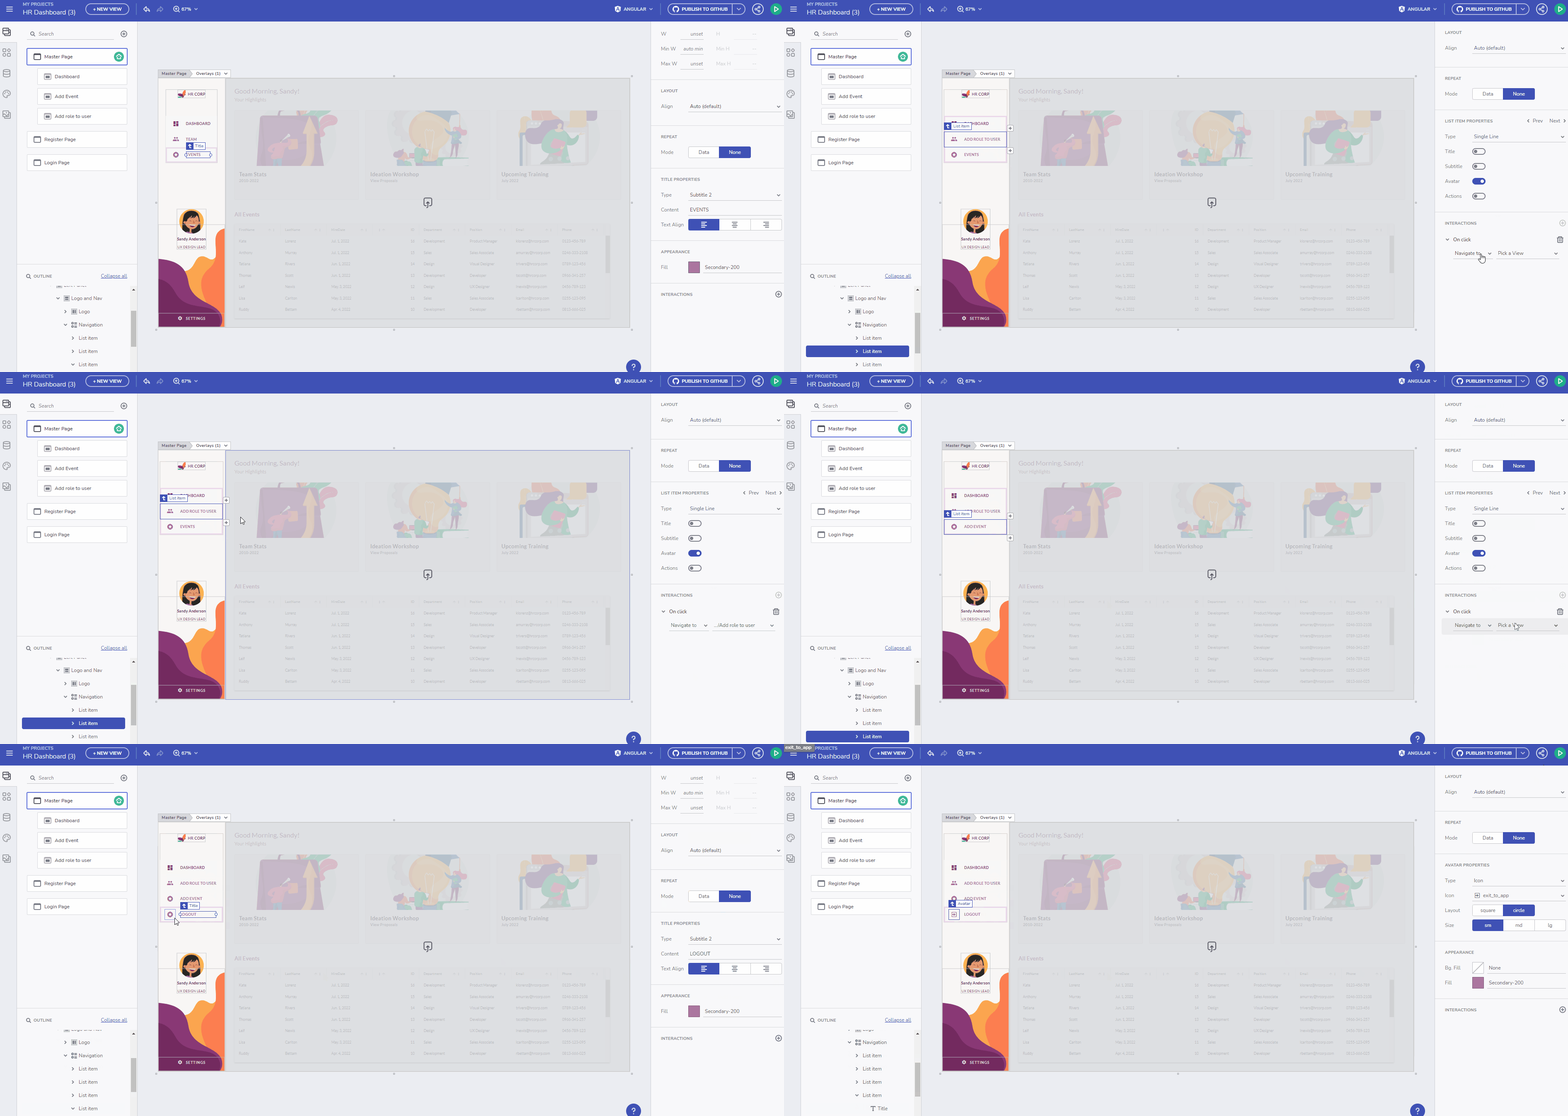
모든 페이지가 만들어진 후 사이드바 네비게이션으로 링크할 수 있습니다.
API를 수동으로 연결할 필요가 없습니다.
다행히 수동으로 API를 연결할 필요가 없습니다. App Builder를 통해 직접 데이터 소스로 업로드하여 이를 수행할 수 있습니다. 먼저 API가 실행 중인지 확인한 다음 데이터 소스 탭으로 이동하여 더하기 아이콘을 선택하고 REST API를 선택해야 합니다. 거기서 두 가지 옵션이 있습니다.
- Swagger 정의를 추가하려면
- 또는 JSON URL을 사용하려면
우리의 목적을 위해 Swagger 접근 방식을 사용하고 URL을 추가할 것입니다.
데이터 소스에 대한 이름을 지정하고 다음 단계로 진행해야 합니다. 그러면 포함할 엔드포인트를 식별해야 합니다. 이 데모에서는 사용 가능한 모든 엔드포인트를 선택할 것입니다. 그러나 이벤트의 모든 엔드포인트는 성공하려면 인증이 필요하다는 점에 유의하는 것이 중요합니다. 따라서 API의 사용자로부터 JWT 토큰을 얻어 인증 탭에 추가해야 합니다.
나중에 튜토리얼에서 이를 현재 사용자의 토큰으로 바꿀 것입니다. 인증이 설정되면 데이터 선택으로 진행하여 모든 필드가 선택되었는지 확인하고 완료를 클릭할 수 있습니다.
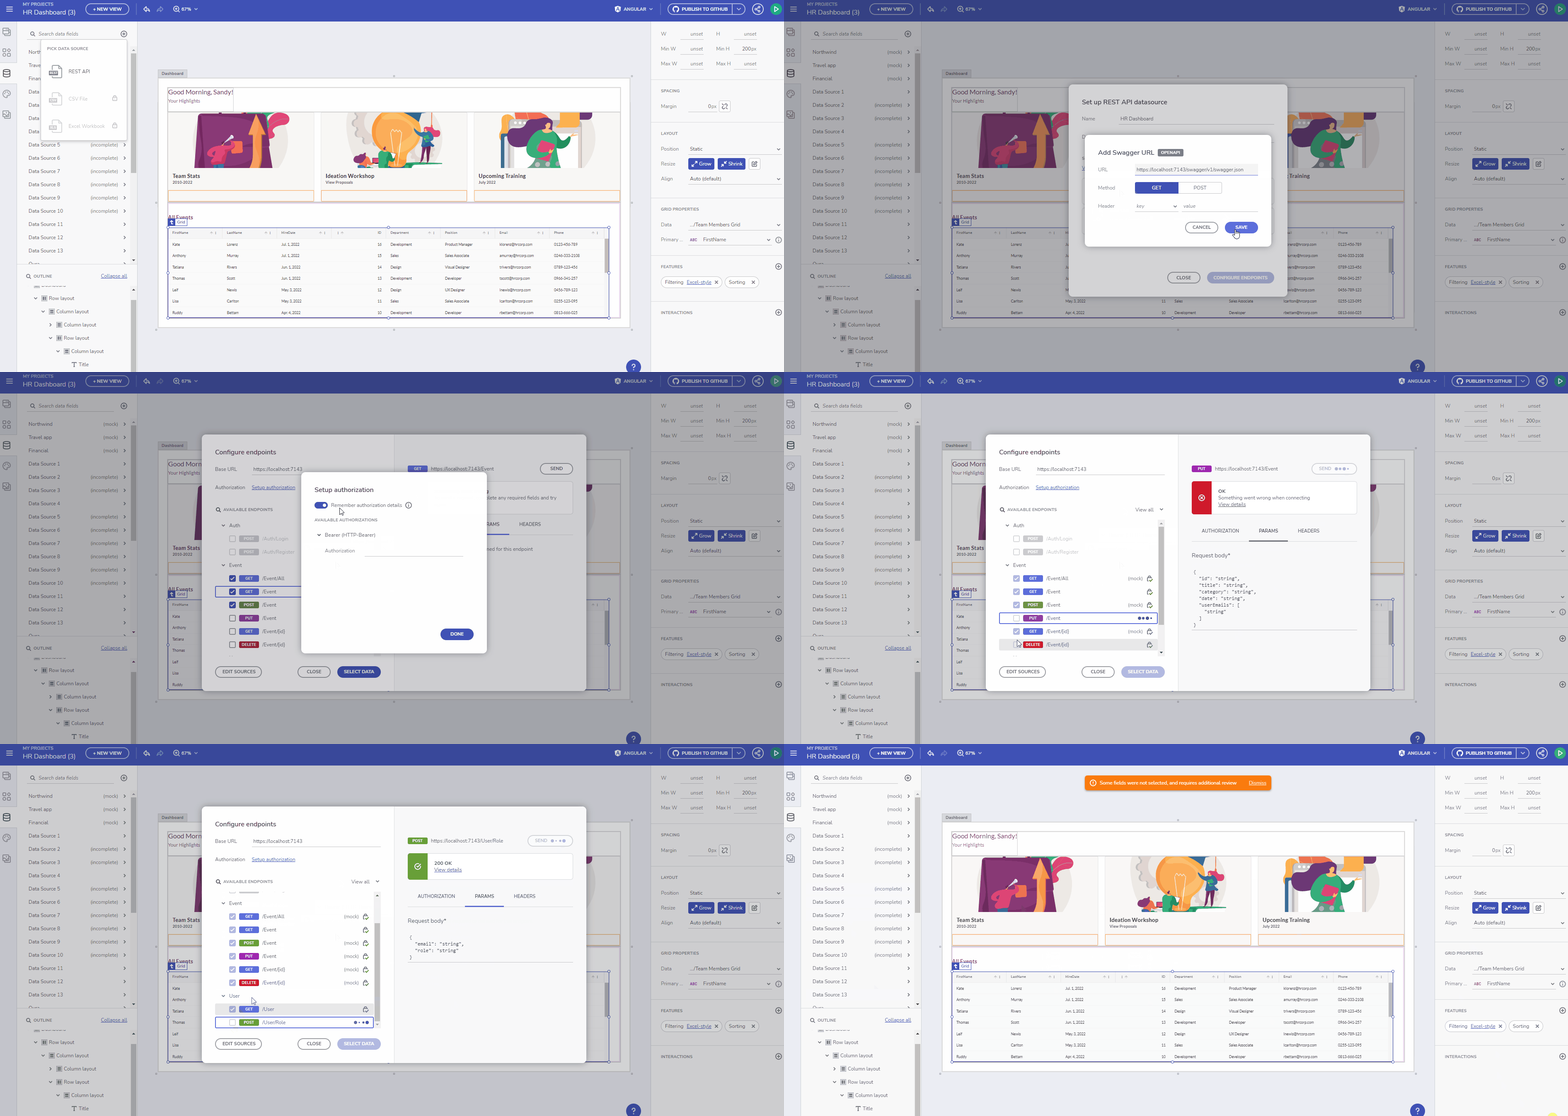
데이터 소스가 성공적으로 업로드되면 대시보드 페이지의 그리드를 연결할 수 있습니다. 먼저 그리드를 선택하고 데이터 필드에서 데이터 소스를 업데이트합니다. 거기서 API의 엔드포인트에 연결될 업데이트 및 삭제 작업을 추가할 수 있으며, 그리드와의 상호 작용을 통해 데이터를 실시간으로 수정할 수 있습니다.
모든 페이지가 만들어지면 오른쪽 상단에 있는 녹색 버튼을 선택하여 애플리케이션을 미리 볼 수 있습니다. 그러면 추가 사용자 정의를 용이하게 하기 위해 애플리케이션을 다운로드해야 합니다.
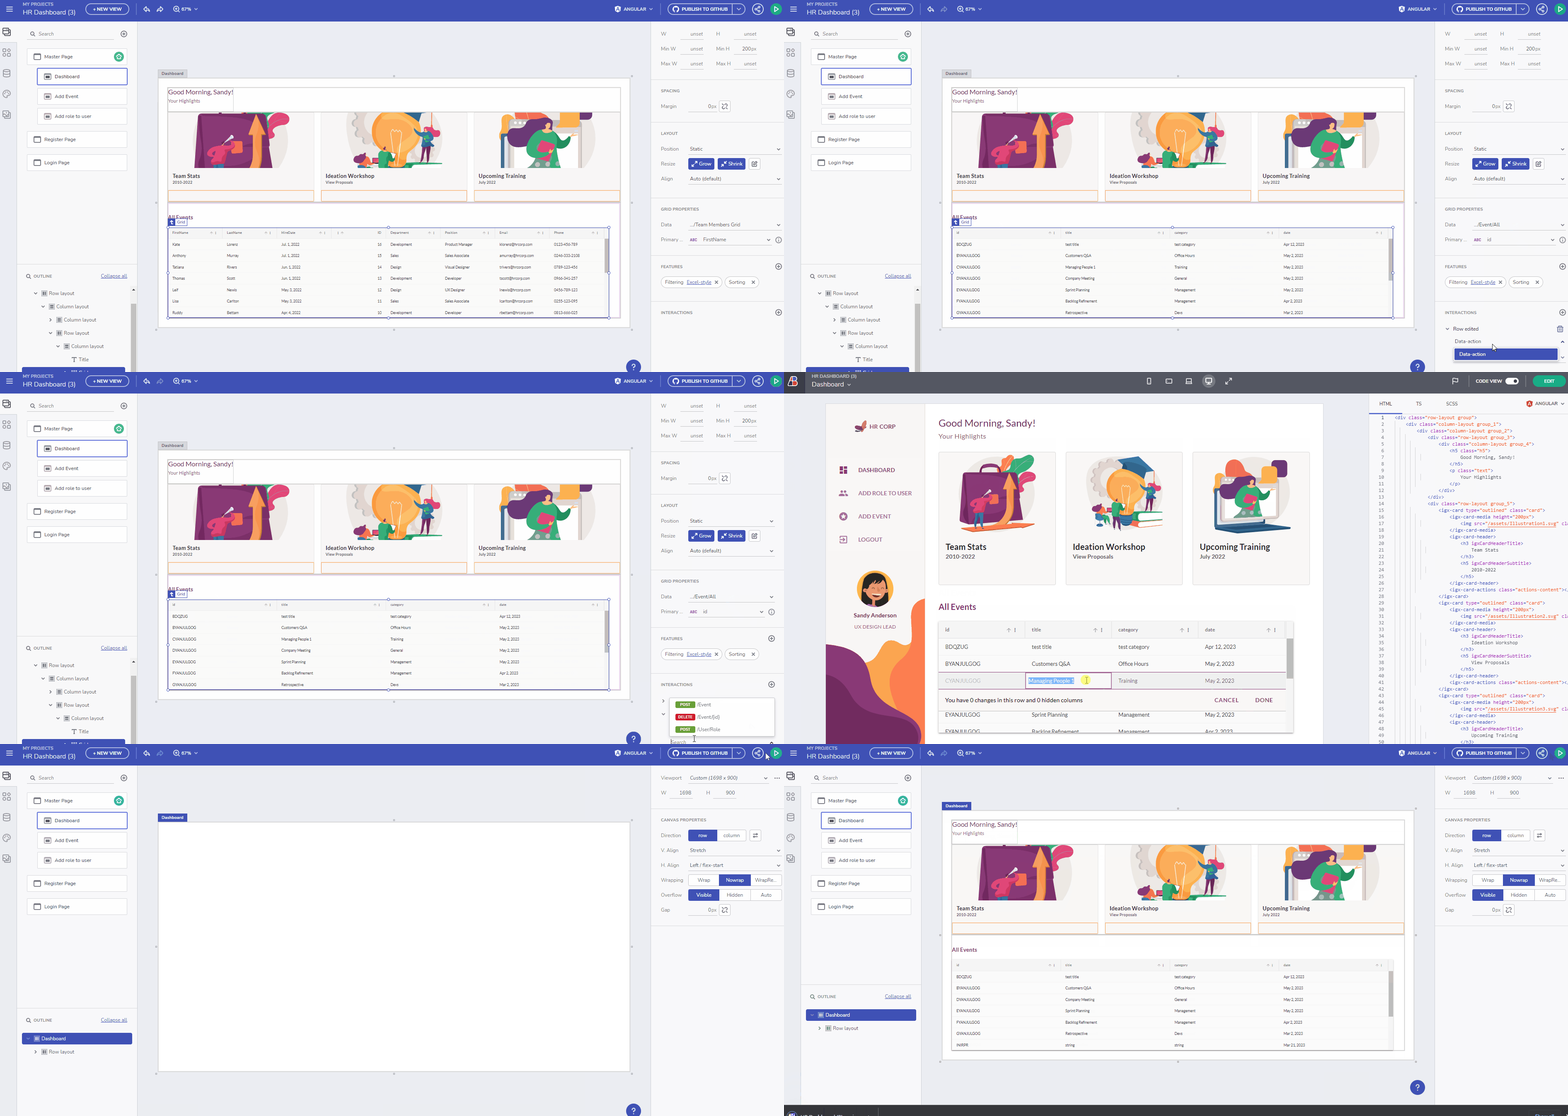
생성한 앱을 로컬로 실행합니다
애플리케이션을 다운로드한 후 프로젝트를 압축 해제하고 Visual Studio Code에서 엽니다. 터미널에서 “npm install”을 실행한 다음 “npm run start”를 실행하여 애플리케이션을 실행합니다.
다음 단계는 로그인 및 등록 페이지를 API와 연결하는 것입니다. 이를 달성하기 위해 API를 호출할 함수를 추가해야 합니다. 이러한 함수는 모든 서비스가 저장되는 services/hrdashboard.service.ts 파일에 추가해야 합니다. 로그인을 위한 함수 하나와 등록을 위한 함수 하나씩 두 가지 더 추가해야 합니다.
…
public registerUser(data: any, contentType: string = 'application/json-patch+json, application/json, text/json, application/*+json') {
    const options = {
    headers: {
        'content-type': contentType
    }
};
const body = data;
    return this.http.post(`${API_ENDPOINT}/Auth/Register`, body, options);
}
  public loginUser(data: any, contentType: string = 'application/json-patch+json, application/json, text/json, application/*+json') {
    const options = {
      headers: {
        'content-type': contentType
      }
    };
    const body = data;
    return this.http.post(`${API_ENDPOINT}/Auth/Login`, body, options);
  }
…
다음 단계에서 register-page.component.ts 파일로 이동하여 입력 속성에 대한 바인딩을 추가합니다. 오류 메시지를 저장할 변수를 만들고 요청이 실패한 경우 사용자에게 유효성 검사를 표시합니다. 또한 양식이 제출될 때 트리거될 함수를 추가합니다. 이 함수는 모든 필드가 필수인지 확인하고 그렇다면 JWT 토큰을 localStorage에 저장하고 홈 페이지로 이동합니다. 필드가 누락된 경우 함수가 사용자에게 오류 메시지를 표시해야 합니다.
export class RegisterPageComponent {
  email: number;
  firstName: string;
  lastName: string;
  password: string;
  confirmedPassword: string;
  errorMessage: string;

  constructor(
    private hRAPIService: HRAPIService,
    private router: Router
  ) { }
  onSubmit(event) {
    event.preventDefault();
    if (this.password !== this.confirmedPassword) {
      this.errorMessage = 'Passwords should match!'
    }
    else if (this.email && this.firstName && this.lastName && this.password) {
      this.hRAPIService.registerUser({ firstName: this.firstName, lastName: this.lastName, email: this.email, password: this.password, confirmedPassword: this.confirmedPassword })
      .subscribe({
        next: (response) => {
          localStorage.setItem('hr_app_token', response['value']);
          this.router.navigateByUrl('/');
        },
        error: (error) => {
          console.log(error)
          this.errorMessage = error.error["errors"] ? Object.values(error.error["errors"])[0] as string : error.error;
        }
      });
    }
    else {
      this.errorMessage = "All fields are required!";
    }
  }
}
또한 register-page.component.html을 업데이트하여 입력을 바인딩해야 합니다.
<div class="column-layout background"></div>
<div class="column-layout group">
    <h2 class="h2">
            Register
    </h2>
    <p class="error-message">{{errorMessage}}</p>
    <igx-input-group type="border" class="input">
            <input type="text" required igxInput [(ngModel)]="firstName"/>
            <label igxLabel>FirstName</label>
    </igx-input-group>
    <igx-input-group type="border" class="input_1">
            <input type="text" required igxInput [(ngModel)]="lastName"/>
            <label igxLabel>Lastname</label>
    </igx-input-group>
    <igx-input-group type="border" class="input_1">
            <input type="email" required igxInput [(ngModel)]="email"/>
            <label igxLabel>Email</label>
    </igx-input-group>
    <igx-input-group type="border" class="input_1">
            <input type="password" required igxInput [(ngModel)]="password"/>
            <label igxLabel>Password</label>
    </igx-input-group>
    <igx-input-group type="border" class="input_1">
            <input type="password" required igxInput [(ngModel)]="confirmedPassword"/>
            <label igxLabel>Confirm password</label>
    </igx-input-group>
      <button (click)="onSubmit($event)" igxButton="raised" igxRipple class="button">
        Register
      </button>
</div>register-page.component.scss의 스타일에 errorMessage를 추가해야 합니다.
.error-message {
  text-align: center;
  margin: 2rem 0;
  font-weight: bold;
  color: red;
}
등록 페이지와 마찬가지로 입력을 바인딩할 속성을 만들어야 합니다. 로그인 페이지의 경우 양식이 제출될 때 실행되는 함수를 만들어야 합니다. 이 함수는 로그인 서비스를 호출하여 사용자의 이메일과 비밀번호를 보내 사용자를 인증합니다. 인증에 성공하면 jwt 토큰을 localStorage에 저장하고 홈 페이지로 이동합니다. 실패하면 사용자에게 오류 메시지를 표시합니다. 또한 login-page.component.html을 업데이트하여 입력을 바인딩해야 합니다.
login.page.component.ts
export class LoginComponent {
  email: number;
  firstName: string;
  lastName: string;
  password: string;
  confirmedPassword: string;
  errorMessage: string;

  constructor(
    private hRAPIService: HRAPIService,
    private router: Router
  ) { }
  onSubmit(event) {
    event.preventDefault();
    if (this.email && this.password) {
      this.hRAPIService.loginUser({ email: this.email, password: this.password })
        .subscribe({
          next: (response) => {
            localStorage.setItem('hr_app_token', response['value']);
            this.router.navigateByUrl('/');
          },
          error: (error) => {
            console.log(error)
            this.errorMessage = error.error["errors"] ? Object.values(error.error["errors"])[0] as string : error.error;
          }
        });
    }
    else {
      this.errorMessage = "All fields are required!";
    }
  }
}
login-page.component.html
<div class="column-layout background"></div>
<div class="column-layout group">
    <h2 class="h2">
            Login
    </h2>
    <p class="error-message">{{errorMessage}}</p>
    <igx-input-group type="border" class="input">
            <input type="text" igxInput [(ngModel)]="email"/>
            <label igxLabel>Email</label>
    </igx-input-group>
    <igx-input-group type="border" class="input_1">
            <input type="password" igxInput [(ngModel)]="password"/>
            <label igxLabel>Password</label>
    </igx-input-group>
      <button (click)="onSubmit($event)" igxButton="raised" igxRipple class="button">
        Login
      </button>
</div>AuthService를 만들어야 합니다. 이는 토큰을 디코드하고, 사용자가 특정 역할을 가지고 있는지 확인하고, 세션을 제거하는 데 도움이 됩니다. 이를 위해 auth.service.ts라는 새 파일을 만들어야 하며, app.module.ts로 가져와야 합니다. 토큰을 디코드하기 위해 jwt-decode 패키지를 설치해야 합니다.
import { Injectable } from "@angular/core";
import jwt_decode from 'jwt-decode
';
type Token = {
    Id?: string,
    email?: string,
    firstName?: string,
    exp?: number,
    role?: string,
    sub?: string,
}
@Injectable({
    providedIn: 'root'
  })
  export class AuthService {
    decodeToken(token) {
        return jwt_decode(token);
    }
    getEmail() {
        const token = localStorage.getItem('hr_app_token');
        const {email}: Token = this.decodeToken(token);
        return email;
    }
    isAuthenticated() {
        const token = localStorage.getItem('hr_app_token');
        if (token) {
            const {email, role}: Token = this.decodeToken(token);
            return email != null && role != null;
        }
        return false;
    }
    isAdmin() {
        const token = localStorage.getItem('hr_app_token');
        const {role}: Token = this.decodeToken(token);
        return this.isAuthenticated() && role === "Administrator";
    }
    logout() {
        localStorage.removeItem('hr_app_token');
    }
}
더 나은 보안을 위해 엔드포인트에 대한 보호 구현
보안을 강화하기 위해 엔드포인트에 대한 보호를 구현해야 합니다. 세 가지 보호를 만들 것인데, 먼저 anonymous-guard.ts부터 시작합니다. 이 보호는 로그인 및 등록 페이지가 로그인하지 않은 사용자만 액세스할 수 있도록 합니다. 이미 로그인한 사용자가 이러한 페이지에 액세스하려고 하면 홈 페이지로 리디렉션되어야 합니다.
이 보호를 구현하기 위해 앱 디렉토리 내에 보호 폴더를 만들고 anonymous-guard.ts라는 새 파일을 만들어야 합니다.
import { Injectable } from '@angular/core';
import { CanActivate, ActivatedRouteSnapshot, RouterStateSnapshot, Router, UrlTree } from '@angular/router';
import { Observable } from 'rxjs';
import { AuthService } from '../services/auth.service';

@Injectable({
    providedIn: 'root'
})
export class AnonymousGuard implements CanActivate {
    constructor(private router: Router,
        private authService: AuthService) { }
    canActivate(
        next: ActivatedRouteSnapshot,
        state: RouterStateSnapshot): Observable
<boolean | UrlTree>
| Promise
<boolean | UrlTree>
| boolean | UrlTree {
        if (!this.authService.isAuthenticated()) {
            return true;
        }
        return this.router.parseUrl("/");
    }
}
다음으로 구현해야 할 보호는 auth-guard라고 합니다. 이 보호는 특정 페이지가 인증된 사용자만 액세스할 수 있도록 합니다.
import { Injectable } from '@angular/core';
import { CanActivate, ActivatedRouteSnapshot, RouterStateSnapshot, Router, UrlTree } from '@angular/router';
import { Observable } from 'rxjs';
import { AuthService } from '../services/auth.service';
@Injectable({
    providedIn: 'root'
})
export class AuthGuard implements CanActivate {
    constructor(private router: Router,
        private authService: AuthService) { }
    canActivate(
        next: ActivatedRouteSnapshot,
        state: RouterStateSnapshot): Observable
<boolean | UrlTree>
| Promise
<boolean | UrlTree>
| boolean | UrlTree {
        if (this.authService.isAuthenticated()) {
            return true;
        }
        return this.router.parseUrl("/login-page");
    }
}
admin-guard라고 불리는 세 번째 보호는 특정 페이지에 대한 액세스를 관리자 역할을 가진 사용자만으로 제한합니다.
import { Injectable } from '@angular/core';
import { CanActivate, ActivatedRouteSnapshot, RouterStateSnapshot, Router, UrlTree } from '@angular/router';
import { Observable } from 'rxjs';
import { AuthService } from '../services/auth.service';

@Injectable({
    providedIn: 'root'
  })
export class AdminGuard implements CanActivate {
    constructor(private router: Router,
        private authService: AuthService) { }

    canActivate(
        next: ActivatedRouteSnapshot,
        state: RouterStateSnapshot): Observable
<boolean | UrlTree>
| Promise
<boolean | UrlTree>
| boolean | UrlTree {
        if (this.authService.isAdmin()) {
            return true;
        }
        return this.router.parseUrl("/login-page");
    }
}
보호를 만든 후에는 적절한 경로에 적용해야 합니다. 이를 하려면 app-routing.module.ts를 열고 각 경로에 canActivate 속성을 추가하고 해당 보호를 추가합니다.
예를 들어, 로그인 및 등록 페이지는 이미 로그인하지 않은 사용자만 액세스할 수 있어야 하므로 경로에 AnonymousGuard를 추가합니다. 마스터 페이지는 인증된 사용자만 액세스할 수 있어야 하므로 해당 경로에 AuthGuard를 추가합니다. 마지막으로 추가 이벤트 및 추가 역할 페이지는 관리자 역할을 가진 사용자만 액세스할 수 있으므로 이러한 경로에 AdminGuard를 연결합니다.
export const routes: Routes = [
  { path: '', redirectTo: 'master-page', pathMatch: 'full' },
  { path: 'error', component: UncaughtErrorComponent },
  { path: 'master-page', loadChildren: () => import('./master-page/master-page.module').then(m => m.MasterPageModule), canActivate: [AuthGuard]},
  { path: 'register-page', component: RegisterPageComponent, data: { text: 'Register Page' }, canActivate: [AnonymousGuard]},
  { path: 'login-page', component: LoginPageComponent, data: { text: 'Login' }, canActivate: [AnonymousGuard]},
  { path: 'add-event', component: AddEventComponent, data: { text: 'Add Event' }, canActivate: [AdminGuard]},
  { path: 'add-role-to-user', component: AddRoleToUserComponent, data: { text: 'Add Role' }, canActivate: [AdminGuard]},
  { path: '**', component: PageNotFoundComponent } // must always be last
];
권한이 없는 사용자가 네비게이션의 특정 링크에 액세스하지 못하도록 숨겨야 합니다. 이를 하려면 master-page.component.html 파일의 추가 이벤트 및 추가 역할을 사용자 옵션에 해당하는 igx-list-item 요소에 *ngIf=“isUserAdmin()” 지시문을 추가할 수 있습니다. 이렇게 하면 관리자 권한이 있는 사용자만 이 링크를 볼 수 있습니다.
이 기능을 구현하려면 master-page.component.ts 파일도 업데이트해야 합니다. 현재 사용자가 관리자인지 확인하는 함수를 만들고 이전에 추가한 *ngIf 지시문에서 사용할 수 있습니다.
추가적으로 로그아웃 함수를 만들고 master-page.component.html 파일의 로그아웃 링크에 해당하는 igx-list-item의 클릭 이벤트에 연결해야 합니다. 이를 통해 사용자가 필요할 때 시스템에서 로그아웃할 수 있습니다.
다음과 같이 보여야 합니다.
…
<igx-list-item [isHeader]="false" routerLink="/master-page/add-role-to-user" *ngIf="isUserAdmin()">
<span igxListThumbnail>
    <igx-avatar icon="people" [roundShape]="true" class="avatar_1"></igx-avatar>
</span>
<span igxListLine>
    <p class="ig-typography__subtitle-2 text_3">
              ADD ROLE TO USER
    </p>
</span>
</igx-list-item>
<igx-list-item [isHeader]="false" routerLink="/master-page/add-event" *ngIf="isUserAdmin()">
<span igxListThumbnail>
    <igx-avatar icon="stars" [roundShape]="true" class="avatar_1"></igx-avatar>
</span>
<span igxListLine>
    <p class="ig-typography__subtitle-2 text_3">
              ADD EVENT
    </p>
</span>
</igx-list-item>
<igx-list-item [isHeader]="false" (click)="logout()">
<span igxListThumbnail>
    <igx-avatar icon="exit_to_app" [roundShape]="true" class="avatar_1"></igx-avatar>
</span>
<span igxListLine>
    <p class="ig-typography__subtitle-2 text_3">
              LOGOUT
    </p>
</span>
</igx-list-item>
…
export class MasterPageComponent {
public listItemVisible = false;
constructor(private authService: AuthService,
private router: Router){}
isUserAdmin() {
return this.authService.isAdmin();
}
logout() {
this.authService.logout();
this.router.navigateByUrl('/login-page');
}
}다음 단계는 추가 이벤트 페이지와 API 간의 연결을 설정하는 것입니다. 이를 달성하기 위해 새 이벤트를 만드는 데 필요한 HTTP POST 요청을 처리할 HRDashboard 서비스 내에 새 함수를 만들어야 합니다.
public postEvent(data: any, contentType: string = 'application/json-patch+json, application/json, text/json, application/*+json'): Observable<any>{
    const options = {
      headers: {
        'content-type': contentType,
        Authorization: `Bearer ${localStorage.getItem('hr_app_token')}`,
      },
    };
    const body = data;
    return this.http.post(`${API_ENDPOINT}/Event`, body, options);
  }
또한 add-event.component.ts 파일에서 입력 필드를 구성 요소에 바인딩할 속성을 정의하고 onSubmit 함수를 추가해야 합니다. 이메일은 쉼표로 구분된 단일 필드로 수신되므로 API로 보내기 전에 분할해야 합니다.
export class AddEventComponent {
  emails: string;
  category: string;
  title: string;
  date: string;
  errorMessage: string;

  constructor(private hrApiService: HRDashboardService,
    private router: Router) {}
  onSubmit(event) {
    event.preventDefault();
    const splitEmails = this.emails.split(', ');
    if (this.emails && this.category && this.title && this.date) {
      this.hrApiService.postEvent({ category: this.category, title: this.title, date: this.date, userEmails: splitEmails})
        .subscribe({
          next: (response) => {
              this.router.navigateByUrl('/');
          },
          error: (error) => {
            console.log(error)
            this.errorMessage = error.error["errors"] ? Object.values(error.error["errors"])[0] as string : error.error;
          }
        });
    }
    else {
      this.errorMessage = "All fields are required!";
    }
  }
}
대시보드 업데이트하기
위의 단계를 완료한 후 대시보드 업데이트로 넘어갈 수 있습니다. 이를 수행하기 전에 HRDashboardService를 수정하여 인증 헤더가 있는 요청에서 **‘Bearer
또한 현재 사용자와 관련된 이벤트만 가져오는 새 함수를 HRDashboardService에 추가해야 합니다.
public getMyEvents(): Observable<any>{
    const options = {
      headers: {
        Authorization: `Bearer ${localStorage.getItem('hr_app_token')}`,
      },
    };
    return this.http.get(`${API_ENDPOINT}/Event`, options);
  }
대시보드 페이지에서 사용자의 이벤트 표시
다음으로 카드 구성 요소를 사용하여 대시보드 페이지에 사용자의 이벤트를 표시합니다. 이를 달성하기 위해 dashboard.component.html 파일을 열고 *ngFor 지시문을 사용하여 현재 사용자의 이벤트를 포함할 myEvents 속성을 기반으로 igx-card 구성 요소를 렌더링해야 합니다. 또한 ***ngIf=“isUserAdmin()“**을 사용하여 그리드가 관리자에게만 표시되도록 할 수 있습니다. 또한 대시보드의 인사말을 업데이트하여 현재 사용자의 이메일을 표시해야 합니다. 예를 들어 “Good Morning, {{email}}!”
결과 파일은 다음과 같이 보여야 합니다.
<div class="row-layout group">
    <div class="column-layout group_1">
        <div class="column-layout group_2">
            <div class="row-layout group_3">
                <div class="column-layout group_4">
                    <h5 class="h5">
                          Good Morning, {{email}}!
                    </h5>
                    <p class="text">
                           Your Highlights
                    </p>
                </div>
            </div>
            <div class="row-layout group_5">
                <igx-card *ngFor="let event of myEvents; index as i;"type="outlined" class="card">
                    <igx-card-media height="200px">
                                    <img src="/assets/Illustration1.svg" class="image" />
                    </igx-card-media>
                    <igx-card-header>
                        <h3 igxCardHeaderTitle>
                                 {{event.title}}
                        </h3>
                        <h5 igxCardHeaderSubtitle>
                                 {{event.category}}
                        </h5>
                        <h5 igxCardHeaderSubtitle>
                                 {{event.date}}
                        </h5>
                    </igx-card-header>
                </igx-card>
            </div>
        </div>
        <div class="row-layout group_6" *ngIf="isUserAdmin()">
            <div class="column-layout group_7">
                <h6 class="h6">
                      All Events
                </h6>
                        <igx-grid [data]="hRDashboardEventAll" primaryKey="id" displayDensity="cosy" [rowEditable]="true" [allowFiltering]="true" filterMode="excelStyleFilter" (rowEditDone)="eventRowEditDone($event)" (rowDeleted)="eventRowDeleted($event)" class="grid">
                          <igx-column field="id" dataType="string" header="id" [sortable]="true" [selectable]="false"></igx-column>
                          <igx-column field="title" dataType="string" header="title" [sortable]="true" [selectable]="false"></igx-column>
                          <igx-column field="category" dataType="string" header="category" [sortable]="true" [selectable]="false"></igx-column>
                          <igx-column field="date" dataType="date" header="date" [sortable]="true" [selectable]="false"></igx-column>
                <igx-action-strip>
                    <igx-grid-pinning-actions></igx-grid-pinning-actions>
                    <igx-grid-editing-actions [addRow]="true"></igx-grid-editing-actions>
                </igx-action-strip>
                        </igx-grid>
            </div>
        </div>
    </div>
</div>
dashboard.component.ts 파일에서 myEvents 및 email이라는 두 가지 속성을 정의해야 합니다. 이러한 속성은 ngOnInit 함수에서 관련 데이터로 채워져야 합니다.
export class DashboardComponent implements OnInit {
  public hRDashboardEventAll: any = null;
  myEvents: any;
  email: any;
  constructor(
    private hRDashboardService: HRDashboardService,
    private authService: AuthService,
  ) {}
  ngOnInit() {
    this.hRDashboardService.getEventAll().subscribe(data => this.hRDashboardEventAll = data);
    this.hRDashboardService.getMyEvents().subscribe(data => this.myEvents = data);
    this.email = this.authService.getEmail();
  }
  public isUserAdmin() {
    return this.authService.isAdmin();
  }
…
이제 대시보드에서 현재 사용자의 모든 이벤트를 볼 수 있으며 사용자가 관리자인 경우 그리드에서 항목을 업데이트하고 삭제할 수 있습니다.
사용자 역할 추가 페이지를 API와 연결하기
마지막 단계는 사용자 역할 추가 페이지와 API 간의 연결을 설정하는 것입니다. 이를 달성하기 위해 HRDashboard 서비스 내에 API에서 사용자 데이터를 가져와 이메일 선택 구성 요소를 채우는 함수를 만들어야 합니다.
public getUsers(): Observable
<any>
{
    const options = {
      headers: {
        Authorization: `Bearer ${localStorage.getItem('hr_app_token')}`,
      },
    };
    return this.http.get(`${API_ENDPOINT}/User`, options);
  }

  public changeUserRole(data: any): Observable
<any>
{
    const options = {
      headers: {
        Authorization: `Bearer ${localStorage.getItem('hr_app_token')}`,
      },
    };
    const body = data;
    return this.http.post(`${API_ENDPOINT}/User/Role`, body, options);
  }
그렇게 한 후에는 add-role-to-user.component.ts로 이동하여 가져올 수 있습니다. 또한 HRDashboard 서비스에서 changeUserRole을 호출할 onSubmit 함수를 만들어야 합니다. 최종 결과는 다음과 같습니다.
export class AddRoleToUserComponent {
  users: any;
  email: string;
  role: string;
  constructor(private hrApiService: HRDashboardService,
    private router: Router) { }
  ngOnInit() {
    this.hrApiService.getUsers()
      .subscribe(data => {
        this.users = data;
      });
  }

  onSubmit(event) {
    event.preventDefault();
    if (this.email && this.role) {
      this.hrApiService.changeUserRole({ email: this.email, role: this.role})
        .subscribe({
          next: (response) => {
              this.router.navigateByUrl('/');
          },
          error: (error) => {
            console.log(error)
          }
        });
    }
  }
}
<div class="row-layout group">
<div class="column-layout group_1">
<h2 class="h2">
Add Role to user
</h2>
<div class="row-layout group_2">
<igx-select type="border" class="select"[(ngModel)]="email">
<igx-select-item *ngFor="let user of users; index as i;" value="{{user.email}}">
{{user.email}}
</igx-select-item>
<label igxLabel>Email</label>
</igx-select>
<igx-select type="border" class="select"[(ngModel)]="role">
<igx-select-item value="Administrator">
Administrator
</igx-select-item>
<label igxLabel>Role</label>
</igx-select>
</div>
<button igxButton="raised" (click)="onSubmit($event)" igxRipple class="button">
Submit
</button>
</div>
</div>필요한 단계를 따르고 필요한 작업을 완료한 후, App Builder로 만들고 API와 통합된 완전히 기능적인 애플리케이션을 갖게 되었습니다. 이는 애플리케이션이 이제 API와 통신할 수 있으므로 사용자가 새 이벤트 만들기, 사용자에게 역할 추가, 개인화된 대시보드 보기와 같은 다양한 작업을 수행할 수 있음을 의미합니다. GitHub에서 데모의 전체 코드를 볼 수 있습니다.