
App BuilderでロールベースAPIを使用してアプリを作成する方法
このチュートリアルでは、ロールベースAPIとローコードApp Builderプラットフォームという2つの強力なツールを使用して、完全に機能可能でカスタマイズ可能なアプリを作成します。
このエキサイティングなチュートリアルでは、2つの強力なツール(前のチュートリアルで構築したAPIとApp Builder™プラットフォーム)を組み合わせることで、スキルを次のレベルに高めます。このようにして、さまざまなプラットフォームで使用できる、完全に機能可能でカスタマイズ可能なアプリケーションを作成します。
App Builderは、ユーザーが最小限のコーディング経験でロバストなアプリケーションを作成できる強力なツールです。ユーザーフレンドリーなインターフェースを使用して、さまざまな要素を簡単にドラッグアンドドロップし、短時間でポーランド語で専門的に見えるアプリケーションを作成し、Angular、Blazor、またはWebコンポーネントのコードを生成できます。
App Builderを試す App Builderを試す App Builderを試す
ローコードApp Builderで最初のアプリケーションを作成する
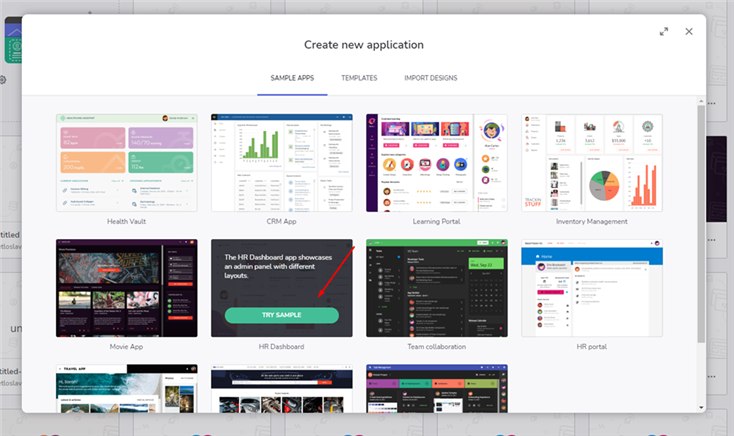
まず、App Builderを起動して「新しいアプリケーションの作成」を選択します。次に、「サンプルアプリ」セクションに移動し、プロジェクトのベースデザインとしてHRダッシュボードを選択します。そこから、デザインを拡張およびカスタマイズして、特定のニーズに合わせることができます。
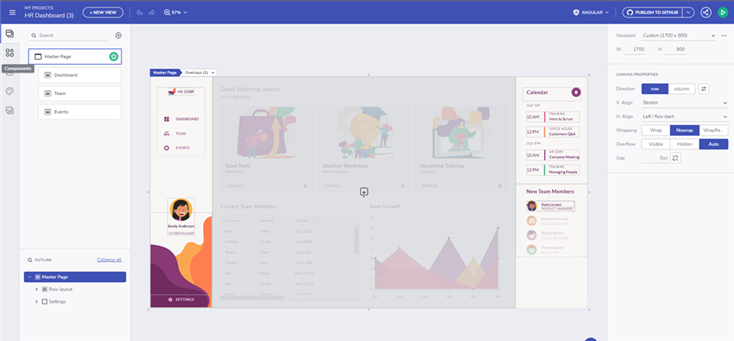
サンプルを開くと、すでにいくつかのページが作成されていることに気付くでしょう。ただし、プロジェクトの要件により適切に合わせるために、これらのページの一部に変更を加え、新しいページも作成する必要があります。
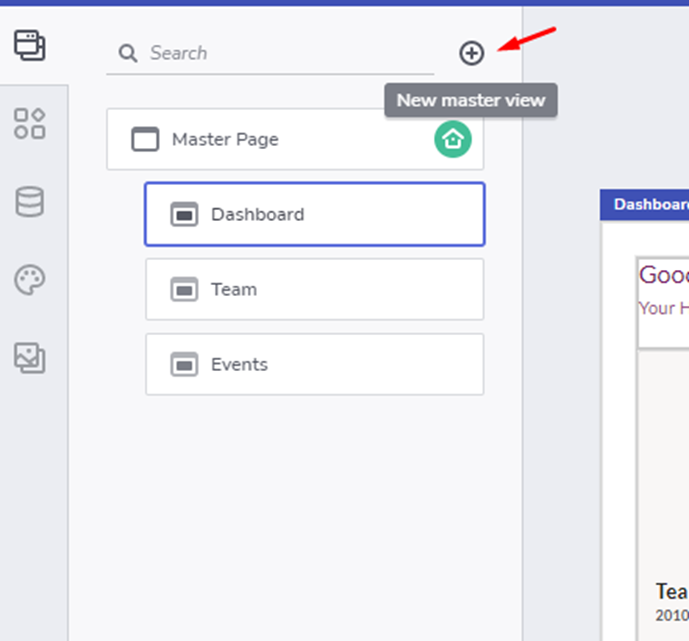
それでは、ログインページと登録ページを作成しましょう。「ビュー」タブに移動し、プラスアイコンをクリックして新しいページを作成します。このページを「登録ページ」と名前付けします。
一貫性を保つために、マスターページの背景を登録ページでも再利用できます。列レイアウトを追加する必要があります。このレイアウト内に、登録コンテンツを含むタイトルと、5つの入力フィールドとボタンを含める必要があります。すべての入力フィールドは必須であり、適切なタイプを指定する必要があることに注意することが重要です。
次に、ログイン画面を作成できます。 この画面には、メールと パスワード用の2つの入力フィールドのみが必要です。プロセスを簡素化するために、登録ページを複製して不要な要素を削除できます。
両方のページが作成されたら、送信ボタンの下に各ページへのリンクを追加できます。
ホームページには、ダッシュボードが表示されます。このダッシュボードは、現在のユーザーが参加しているすべてのイベントをカードコンポーネントに表示します。ユーザーが管理者ロールを持っている場合、プラットフォーム上のすべてのイベントを含むグリッドも表示され、必要に応じてCRUD操作を実行できます。

進めていくと、新しいイベントを追加するためのページを作成します。 このページは管理者ロールを持つユーザーのみがアクセス可能ですが、それについてはチュートリアルの後半で説明します。各イベントについて、タイトル、カテゴリ、参加ユーザーのメール、およびイベントの日付が必要になります。
さらに、ユーザーのロールを変更するための同様のページを作成する必要があります。イベントページと同様に、この機能は管理者のみがアクセス可能です。このデモの目的上、他のユーザーに管理者権限を付与するサポートのみ行います。
すべてのページが作成された後、それらをサイドバーナビゲーションにリンクできます。
APIを手動で接続する必要はありません
幸いなことに、APIを手動で接続する必要はありません。App Builderを通じてそれをデータソースとしてアップロードすることで実現できます。まず、APIが実行中であることを確認してから、「データソース」タブに移動し、プラスアイコンを選択して、REST APIを選択する必要があります。そこから、2つのオプションがあります。
- Swagger定義を追加する
- またはJSON URLを使用する
目的のため、Swaggerアプローチを利用し、URLを追加します。
データソースの名前を指定して、次のステップに進む必要があります。次に、含める予定のエンドポイントを特定する必要があります。このデモでは、利用可能なすべてのエンドポイントを選択します。ただし、イベントのすべてのエンドポイントは成功するために認可が必要であることに注意することが重要です。したがって、APIのユーザーからJWTトークンを取得し、認可タブに追加する必要があります。
後でチュートリアルで、これを現在のユーザーのトークンに置き換えます。認可が設定されたら、「データを選択」に進み、すべてのフィールドが選択されていることを確認し、「完了」をクリックできます。
データソースが正常にアップロードされた後、ダッシュボードページのグリッドを接続することに進みます。まず、グリッドを選択し、データフィールドからデータソースを更新します。そこから、APIのエンドポイントにリンクされた更新および削除操作を追加でき、グリッドとのやり取りを通じてデータをライブ修正できます。
すべてのページが作成された後、右上隅にある緑色のボタンを選択してアプリケーションをプレビューできます。その後、さらなるカスタマイズを容易にするためにアプリケーションをダウンロードする必要があります。
作成したアプリをローカルで実行する
アプリケーションがダウンロードされたら、プロジェクトを解凍してVisual Studio Codeで開きます。ターミナルで「npm install」を実行し、「npm run start」を実行してアプリケーションの実行を開始します。
次のステップは、ログインおよび登録ページをAPIに接続することです。これを実現するために、APIを呼び出す関数を追加する必要があります。これらの関数は、すべてのサービスが保存されているservices/hrdashboard.service.tsファイルに追加する必要があります。ログイン用と登録用の2つの関数を追加する必要があります。
…
public registerUser(data: any, contentType: string = 'application/json-patch+json, application/json, text/json, application/*+json') {
    const options = {
    headers: {
        'content-type': contentType
    }
};
const body = data;
    return this.http.post(`${API_ENDPOINT}/Auth/Register`, body, options);
}
  public loginUser(data: any, contentType: string = 'application/json-patch+json, application/json, text/json, application/*+json') {
    const options = {
      headers: {
        'content-type': contentType
      }
    };
    const body = data;
    return this.http.post(`${API_ENDPOINT}/Auth/Login`, body, options);
  }
…次のステップでは、register-page.component.tsファイルに移動し、入力プロパティのバインディングを追加します。エラーメッセージを保存する変数を作成し、リクエストが失敗した場合、ユーザーに検証を表示します。また、フォームが送信されたときにトリガーされる関数を追加します。この関数は、すべてのフィールドが必須かどうかを確認し、そうであれば、JWTトークンをlocalStorageに保存し、ホームページに移動します。フィールドが不足している場合、関数はエラーメッセージをユーザーに表示します。
export class RegisterPageComponent {
  email: number;
  firstName: string;
  lastName: string;
  password: string;
  confirmedPassword: string;
  errorMessage: string;

  constructor(
    private hRAPIService: HRAPIService,
    private router: Router
  ) { }
  onSubmit(event) {
    event.preventDefault();
    if (this.password !== this.confirmedPassword) {
      this.errorMessage = 'Passwords should match!'
    }
    else if (this.email && this.firstName && this.lastName && this.password) {
      this.hRAPIService.registerUser({ firstName: this.firstName, lastName: this.lastName, email: this.email, password: this.password, confirmedPassword: this.confirmedPassword })
      .subscribe({
        next: (response) => {
          localStorage.setItem('hr_app_token', response['value']);
          this.router.navigateByUrl('/');
        },
        error: (error) => {
          console.log(error)
          this.errorMessage = error.error["errors"] ? Object.values(error.error["errors"])[0] as string : error.error;
        }
      });
    }
    else {
      this.errorMessage = "All fields are required!";
    }
  }
}また、register-page.component.htmlを更新して入力をバインドする必要があります。
<div class="column-layout background"></div>
<div class="column-layout group">
    <h2 class="h2">
            Register
    </h2>
    <p class="error-message">{{errorMessage}}</p>
    <igx-input-group type="border" class="input">
            <input type="text" required igxInput [(ngModel)]="firstName"/>
            <label igxLabel>FirstName</label>
    </igx-input-group>
    <igx-input-group type="border" class="input_1">
            <input type="text" required igxInput [(ngModel)]="lastName"/>
            <label igxLabel>Lastname</label>
    </igx-input-group>
    <igx-input-group type="border" class="input_1">
            <input type="email" required igxInput [(ngModel)]="email"/>
            <label igxLabel>Email</label>
    </igx-input-group>
    <igx-input-group type="border" class="input_1">
            <input type="password" required igxInput [(ngModel)]="password"/>
            <label igxLabel>Password</label>
    </igx-input-group>
    <igx-input-group type="border" class="input_1">
            <input type="password" required igxInput [(ngModel)]="confirmedPassword"/>
            <label igxLabel>Confirm password</label>
    </igx-input-group>
      <button (click)="onSubmit($event)" igxButton="raised" igxRipple class="button">
        Register
      </button>
</div>errorMessageのスタイルを設定するには、register-page.component.scssにスタイルを追加する必要があります。
.error-message {
  text-align: center;
  margin: 2rem 0;
  font-weight: bold;
  color: red;
}登録ページと同様に、入力をバインドするプロパティを作成し、ログインページでフォームが送信されるときに実行される関数を作成する必要があります。この関数は、ログインサービスを呼び出してメールとパスワードを送信することでユーザーを認証します。認証が成功した場合、jwtトークンをlocalStorageに保存し、ホームページに移動します。失敗した場合、エラーメッセージをユーザーに表示します。また、login-page.component.htmlを更新して入力をバインドする必要があります。
login.page.component.ts
export class LoginComponent {
  email: number;
  firstName: string;
  lastName: string;
  password: string;
  confirmedPassword: string;
  errorMessage: string;

  constructor(
    private hRAPIService: HRAPIService,
    private router: Router
  ) { }
  onSubmit(event) {
    event.preventDefault();
    if (this.email && this.password) {
      this.hRAPIService.loginUser({ email: this.email, password: this.password })
        .subscribe({
          next: (response) => {
            localStorage.setItem('hr_app_token', response['value']);
            this.router.navigateByUrl('/');
          },
          error: (error) => {
            console.log(error)
            this.errorMessage = error.error["errors"] ? Object.values(error.error["errors"])[0] as string : error.error;
          }
        });
    }
    else {
      this.errorMessage = "All fields are required!";
    }
  }
}
login-page.component.html
<div class="column-layout background"></div>
<div class="column-layout group">
    <h2 class="h2">
            Login
    </h2>
    <p class="error-message">{{errorMessage}}</p>
    <igx-input-group type="border" class="input">
            <input type="text" igxInput [(ngModel)]="email"/>
            <label igxLabel>Email</label>
    </igx-input-group>
    <igx-input-group type="border" class="input_1">
            <input type="password" igxInput [(ngModel)]="password"/>
            <label igxLabel>Password</label>
    </igx-input-group>
      <button (click)="onSubmit($event)" igxButton="raised" igxRipple class="button">
        Login
      </button>
</div>トークンをデコードし、ユーザーが特定のロールを持っているかを確認し、セッションを削除するのに役立つAuthServiceを作成する必要があります。そのために、auth.service.tsという名前の新しいファイルを作成します。このファイルをapp.module.tsにインポートする必要があります。トークンをデコードするためには、jwt-decodeパッケージをインストールする必要があります。
import { Injectable } from "@angular/core";
import jwt_decode from 'jwt-decode
';
type Token = {
    Id?: string,
    email?: string,
    firstName?: string,
    exp?: number,
    role?: string,
    sub?: string,
}
@Injectable({
    providedIn: 'root'
  })
  export class AuthService {
    decodeToken(token) {
        return jwt_decode(token);
    }
    getEmail() {
        const token = localStorage.getItem('hr_app_token');
        const {email}: Token = this.decodeToken(token);
        return email;
    }
    isAuthenticated() {
        const token = localStorage.getItem('hr_app_token');
        if (token) {
            const {email, role}: Token = this.decodeToken(token);
            return email != null && role != null;
        }
        return false;
    }
    isAdmin() {
        const token = localStorage.getItem('hr_app_token');
        const {role}: Token = this.decodeToken(token);
        return this.isAuthenticated() && role === "Administrator";
    }
    logout() {
        localStorage.removeItem('hr_app_token');
    }
}
エンドポイントのガードを実装してセキュリティを強化する
セキュリティを強化するため、エンドポイントのガードを実装する必要があります。anonymous-guard.tsから始まる3つのガードを作成します。このガードは、ログインページと登録ページが、ログインしていないユーザーのみがアクセス可能であることを確認します。既にログインしているユーザーがこれらのページにアクセスしようとした場合、ホームページにリダイレクトされるべきです。
このガードを実装するため、appディレクトリ内にguardsフォルダを作成し、anonymous-guard.tsという名前の新しいファイルを作成します。
import { Injectable } from '@angular/core';
import { CanActivate, ActivatedRouteSnapshot, RouterStateSnapshot, Router, UrlTree } from '@angular/router';
import { Observable } from 'rxjs';
import { AuthService } from '../services/auth.service';

@Injectable({
    providedIn: 'root'
})
export class AnonymousGuard implements CanActivate {
    constructor(private router: Router,
        private authService: AuthService) { }
    canActivate(
        next: ActivatedRouteSnapshot,
        state: RouterStateSnapshot): Observable
<boolean | UrlTree>
| Promise
<boolean | UrlTree>
| boolean | UrlTree {
        if (!this.authService.isAuthenticated()) {
            return true;
        }
        return this.router.parseUrl("/");
    }
}次に実装する必要があるガードはauth-guardと呼ばれています。このガードは、特定のページが認証されたユーザーのみがアクセス可能であることを確認します。
import { Injectable } from '@angular/core';
import { CanActivate, ActivatedRouteSnapshot, RouterStateSnapshot, Router, UrlTree } from '@angular/router';
import { Observable } from 'rxjs';
import { AuthService } from '../services/auth.service';
@Injectable({
    providedIn: 'root'
})
export class AuthGuard implements CanActivate {
    constructor(private router: Router,
        private authService: AuthService) { }
    canActivate(
        next: ActivatedRouteSnapshot,
        state: RouterStateSnapshot): Observable
<boolean | UrlTree>
| Promise
<boolean | UrlTree>
| boolean | UrlTree {
        if (this.authService.isAuthenticated()) {
            return true;
        }
        return this.router.parseUrl("/login-page");
    }
}
admin-guardと呼ばれる3番目のガードは、特定のページへのアクセスを管理者ロールを持つユーザーのみに制限します。
import { Injectable } from '@angular/core';
import { CanActivate, ActivatedRouteSnapshot, RouterStateSnapshot, Router, UrlTree } from '@angular/router';
import { Observable } from 'rxjs';
import { AuthService } from '../services/auth.service';

@Injectable({
    providedIn: 'root'
  })
export class AdminGuard implements CanActivate {
    constructor(private router: Router,
        private authService: AuthService) { }

    canActivate(
        next: ActivatedRouteSnapshot,
        state: RouterStateSnapshot): Observable
<boolean | UrlTree>
| Promise
<boolean | UrlTree>
| boolean | UrlTree {
        if (this.authService.isAdmin()) {
            return true;
        }
        return this.router.parseUrl("/login-page");
    }
}ガードを作成した後、適切なルートに適用する必要があります。そのために、app-routing.module.tsを開き、各ルートにcanActivateプロパティと対応するガードを追加します。
例えば、ログインページと登録ページはすでにログインしていないユーザーのみがアクセス可能である必要があるため、これらのルートにAnonymousGuardを追加します。マスターページは認証されたユーザーのみがアクセス可能である必要があるため、そのルートにAuthGuardを追加します。最後に、追加イベントページと追加ロールページは管理者ロールを持つユーザーのみがアクセス可能である必要があるため、これらのルートにAdminGuardを付加します。
export const routes: Routes = [
  { path: '', redirectTo: 'master-page', pathMatch: 'full' },
  { path: 'error', component: UncaughtErrorComponent },
  { path: 'master-page', loadChildren: () => import('./master-page/master-page.module').then(m => m.MasterPageModule), canActivate: [AuthGuard]},
  { path: 'register-page', component: RegisterPageComponent, data: { text: 'Register Page' }, canActivate: [AnonymousGuard]},
  { path: 'login-page', component: LoginPageComponent, data: { text: 'Login' }, canActivate: [AnonymousGuard]},
  { path: 'add-event', component: AddEventComponent, data: { text: 'Add Event' }, canActivate: [AdminGuard]},
  { path: 'add-role-to-user', component: AddRoleToUserComponent, data: { text: 'Add Role' }, canActivate: [AdminGuard]},
  { path: '**', component: PageNotFoundComponent } // must always be last
];
権限のないユーザーが特定のリンクにアクセスできないようにするため、リンクを隠す必要があります。そのために、master-page.component.htmlファイルのADD EVENTおよびADD ROLE TO USERオプションに対応するigx-list-item要素に***ngIf=“isUserAdmin()“**ディレクティブを追加できます。そのようにして、これらのリンクが管理者特権を持つユーザーのみに表示されることを確認します。
この機能を実装するために、master-page.component.tsファイルも更新する必要があります。現在のユーザーが管理者であるかどうかを確認する関数を作成し、前に追加した***ngIf**ディレクティブで使用できます。
さらに、ログアウト関数を作成し、LOGOUTリンクに対応するigx-list-itemのクリックイベントに付加する必要があります。これにより、ユーザーが必要に応じてシステムからログアウトできます。
以下のようになります。
…
<igx-list-item [isHeader]="false" routerLink="/master-page/add-role-to-user" *ngIf="isUserAdmin()">
<span igxListThumbnail>
    <igx-avatar icon="people" [roundShape]="true" class="avatar_1"></igx-avatar>
</span>
<span igxListLine>
    <p class="ig-typography__subtitle-2 text_3">
              ADD ROLE TO USER
    </p>
</span>
</igx-list-item>
<igx-list-item [isHeader]="false" routerLink="/master-page/add-event" *ngIf="isUserAdmin()">
<span igxListThumbnail>
    <igx-avatar icon="stars" [roundShape]="true" class="avatar_1"></igx-avatar>
</span>
<span igxListLine>
    <p class="ig-typography__subtitle-2 text_3">
              ADD EVENT
    </p>
</span>
</igx-list-item>
<igx-list-item [isHeader]="false" (click)="logout()">
<span igxListThumbnail>
    <igx-avatar icon="exit_to_app" [roundShape]="true" class="avatar_1"></igx-avatar>
</span>
<span igxListLine>
    <p class="ig-typography__subtitle-2 text_3">
              LOGOUT
    </p>
</span>
</igx-list-item>
…
export class MasterPageComponent {
public listItemVisible = false;
constructor(private authService: AuthService,
private router: Router){}
isUserAdmin() {
return this.authService.isAdmin();
}
logout() {
this.authService.logout();
this.router.navigateByUrl('/login-page');
}
}次のステップは、追加イベントページとAPIの間に接続を確立することです。これを実現するために、新しいイベント作成用のHTTP POSTリクエストを処理するHRDashboardサービス内に新しい関数を作成する必要があります。
public postEvent(data: any, contentType: string = 'application/json-patch+json, application/json, text/json, application/*+json'): Observable<any>{
    const options = {
      headers: {
        'content-type': contentType,
        Authorization: `Bearer ${localStorage.getItem('hr_app_token')}`,
      },
    };
    const body = data;
    return this.http.post(`${API_ENDPOINT}/Event`, body, options);
}さらに、add-event.component.tsファイルでは、入力フィールドをコンポーネントにバインドするプロパティを定義し、onSubmit関数を追加する必要があります。メールはコンマで区切られた単一フィールドで受け取られるため、APIに送信する前に分割する必要があります。
export class AddEventComponent {
  emails: string;
  category: string;
  title: string;
  date: string;
  errorMessage: string;

  constructor(private hrApiService: HRDashboardService,
    private router: Router) {}
  onSubmit(event) {
    event.preventDefault();
    const splitEmails = this.emails.split(', ');
    if (this.emails && this.category && this.title && this.date) {
      this.hrApiService.postEvent({ category: this.category, title: this.title, date: this.date, userEmails: splitEmails})
        .subscribe({
          next: (response) => {
              this.router.navigateByUrl('/');
          },
          error: (error) => {
            console.log(error)
            this.errorMessage = error.error["errors"] ? Object.values(error.error["errors"])[0] as string : error.error;
          }
        });
    }
    else {
      this.errorMessage = "All fields are required!";
    }
  }
}
ダッシュボードを更新する
上記のステップが完了したら、ダッシュボードの更新に進むことができます。これより前に、HRDashboardServiceを変更して、認可ヘッダーを持つリクエストの**‘Bearer
さらに、現在のユーザーに関連するイベントのみをフェッチする新しい関数をHRDashboardServiceに追加する必要があります。
public getMyEvents(): Observable<any>{
    const options = {
      headers: {
        Authorization: `Bearer ${localStorage.getItem('hr_app_token')}`,
      },
    };
    return this.http.get(`${API_ENDPOINT}/Event`, options);
  }
ダッシュボードページにユーザーのイベントを表示する
次に、カードコンポーネントを使用してダッシュボードページにユーザーのイベントを表示します。これを実現するために、dashboard.component.htmlファイルを開き、*ngForディレクティブを使用して、現在のユーザーのイベントを含むmyEventsプロパティに基づいてigx-cardコンポーネントをレンダリングします。さらに、***ngIf=“isUserAdmin()“を使用して、グリッドが管理者のみに表示されることを確認できます。さらに、ダッシュボードの挨拶を更新して、現在のユーザーのメールを表示する必要があります。例えば、「Good Morning, {{email}}!」**のようにです。
結果のファイルは以下のようになります。
<div class="row-layout group">
    <div class="column-layout group_1">
        <div class="column-layout group_2">
            <div class="row-layout group_3">
                <div class="column-layout group_4">
                    <h5 class="h5">
                          Good Morning, {{email}}!
                    </h5>
                    <p class="text">
                           Your Highlights
                    </p>
                </div>
            </div>
            <div class="row-layout group_5">
                <igx-card *ngFor="let event of myEvents; index as i;"type="outlined" class="card">
                    <igx-card-media height="200px">
                                    <img src="/assets/Illustration1.svg" class="image" />
                    </igx-card-media>
                    <igx-card-header>
                        <h3 igxCardHeaderTitle>
                                 {{event.title}}
                        </h3>
                        <h5 igxCardHeaderSubtitle>
                                 {{event.category}}
                        </h5>
                        <h5 igxCardHeaderSubtitle>
                                 {{event.date}}
                        </h5>
                    </igx-card-header>
                </igx-card>
            </div>
        </div>
        <div class="row-layout group_6" *ngIf="isUserAdmin()">
            <div class="column-layout group_7">
                <h6 class="h6">
                      All Events
                </h6>
                        <igx-grid [data]="hRDashboardEventAll" primaryKey="id" displayDensity="cosy" [rowEditable]="true" [allowFiltering]="true" filterMode="excelStyleFilter" (rowEditDone)="eventRowEditDone($event)" (rowDeleted)="eventRowDeleted($event)" class="grid">
                          <igx-column field="id" dataType="string" header="id" [sortable]="true" [selectable]="false"></igx-column>
                          <igx-column field="title" dataType="string" header="title" [sortable]="true" [selectable]="false"></igx-column>
                          <igx-column field="category" dataType="string" header="category" [sortable]="true" [selectable]="false"></igx-column>
                          <igx-column field="date" dataType="date" header="date" [sortable]="true" [selectable]="false"></igx-column>
                <igx-action-strip>
                    <igx-grid-pinning-actions></igx-grid-pinning-actions>
                    <igx-grid-editing-actions [addRow]="true"></igx-grid-editing-actions>
                </igx-action-strip>
                        </igx-grid>
            </div>
        </div>
    </div>
</div>dashboard.component.tsファイルでは、myEventsとemailという2つのプロパティを定義する必要があります。これらのプロパティは、ngOnInit関数で関連するデータで入力される必要があります。
export class DashboardComponent implements OnInit {
  public hRDashboardEventAll: any = null;
  myEvents: any;
  email: any;
  constructor(
    private hRDashboardService: HRDashboardService,
    private authService: AuthService,
  ) {}
  ngOnInit() {
    this.hRDashboardService.getEventAll().subscribe(data => this.hRDashboardEventAll = data);
    this.hRDashboardService.getMyEvents().subscribe(data => this.myEvents = data);
    this.email = this.authService.getEmail();
  }
  public isUserAdmin() {
    return this.authService.isAdmin();
  }
…
ダッシュボードで現在のユーザーのすべてのイベント、およびユーザーが管理者である場合、グリッドからのエントリを更新および削除できるようになりました。
ユーザーページへのロール追加とAPIの接続
最後のステップは、ロール追加ページとAPIの間に接続を確立する**ことです。これを実現するために、HRDashboardサービス内にAPIからユーザーデータをフェッチし、メールセレクトコンポーネントを入力する関数を作成する必要があります。
public getUsers(): Observable
<any>
{
    const options = {
      headers: {
        Authorization: `Bearer ${localStorage.getItem('hr_app_token')}`,
      },
    };
    return this.http.get(`${API_ENDPOINT}/User`, options);
  }

  public changeUserRole(data: any): Observable
<any>
{
    const options = {
      headers: {
        Authorization: `Bearer ${localStorage.getItem('hr_app_token')}`,
      },
    };
    const body = data;
    return this.http.post(`${API_ENDPOINT}/User/Role`, body, options);
}それが完了したら、add-role-to-user.component.tsに移動してそれらをフェッチできます。また、HRDashboardサービスからchangeUserRoleを呼び出すonSubmit関数を作成する必要があります。最終的な結果は以下のようになります。
export class AddRoleToUserComponent {
  users: any;
  email: string;
  role: string;
  constructor(private hrApiService: HRDashboardService,
    private router: Router) { }
  ngOnInit() {
    this.hrApiService.getUsers()
      .subscribe(data => {
        this.users = data;
      });
  }

  onSubmit(event) {
    event.preventDefault();
    if (this.email && this.role) {
      this.hrApiService.changeUserRole({ email: this.email, role: this.role})
        .subscribe({
          next: (response) => {
              this.router.navigateByUrl('/');
          },
          error: (error) => {
            console.log(error)
          }
        });
    }
  }
}
<div class="row-layout group">
<div class="column-layout group_1">
<h2 class="h2">
Add Role to user
</h2>
<div class="row-layout group_2">
<igx-select type="border" class="select"[(ngModel)]="email">
<igx-select-item *ngFor="let user of users; index as i;" value="{{user.email}}">
{{user.email}}
</igx-select-item>
<label igxLabel>Email</label>
</igx-select>
<igx-select type="border" class="select"[(ngModel)]="role">
<igx-select-item value="Administrator">
Administrator
</igx-select-item>
<label igxLabel>Role</label>
</igx-select>
</div>
<button igxButton="raised" (click)="onSubmit($event)" igxRipple class="button">
Submit
</button>
</div>
</div>必要なステップに従い、必要なタスクを完了した後、App Builderで構築され、APIと統合された完全に機能的なアプリケーションが完成します。これにより、アプリケーションはAPIと通信できるようになり、ユーザーが新しいイベントの作成、ユーザーへのロール追加、パーソナライズされたダッシュボードの表示など、さまざまなアクションを実行できるようになります。デモの完全なコードはGitHubで確認できます。